Here is the card closed, opened half way, and opened fully:

 |
| Please ignore the ruler. I have it here to hold the card closed. |

I'm already thinking of other shaped openings and treatments for this style card, but first things first. Here are the dimensions and directions.
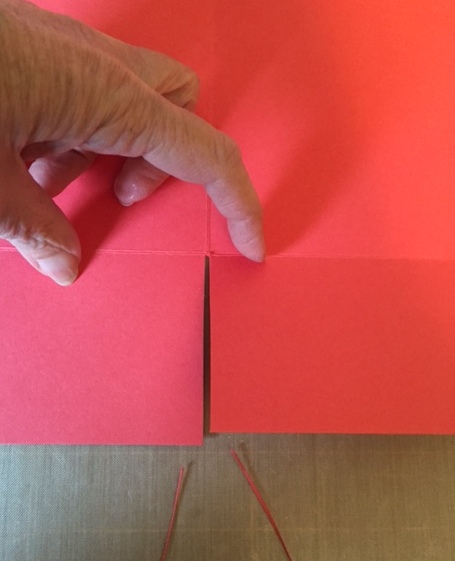
The main part of the card begins with an 8.5" x 11" sheet of paper, in this case, Watermelon Wonder. Score that sheet at 4.25", turn and score again at 2.75" from each end (2.75" and 8.25")


Fold on the score lines and use the bone folder to give all those lines a good crease.


This can be easily trimmed off with scissors. Next you will in from the short sides of your paper as shown.

The other papers and dimensions you will need are shown here. I will explain what I changed on the front of the card when I get to that part of construction.

The above photo shows white cardstock (2 pieces) cut at 4" x 5.25" for the inside of the card where the sentiment will go. In the upper right corner are DSP (Designer Series Papers), each cut at 2.25" x 4", a total of 8 pieces. The original directions called for all of them to be the same paper but I didn't have enough of one design. My papers came from a well used (nearly gone) 6" square pad.
Lower left in the above photo has Old Olive cut at 4" x 5.25", Watermelon Wonder cut at 3.25" x 4" and DSP cut at 3" x 3.75". Those three pieces will be used on the front of the card, but changes will follow. ***
The eight pieces of DSP are glued to both sides of the outer panels of the card base. I neglected to get a photo of just that step, but here they are in place with the peek-a-boo holes punched in them. This was done with a 1 3/8" circle punch.


In order to make scalloped frames for both sides of these holes, I punched four holes with the 1 3/8" punch on Old Olive paper, leaving room to punch around these holes with a 1.75" scalloped punch. The green circles will go in my odds and ends stash for use on some future project. Here are the frames in place around the holes. In the second photo I've adhered the white papers in place.


I have many Stampin' Up stamps, but not a good variety to fit within these small windows that go with an anniversary theme. I stamped Best Wishes (from Petite Pairs stamp set), Happy Anniversary (from Teeny Tiny Wishes) in Old Olive, and two flowers (from Stippled Blossoms) in Watermelon Wonder. The Happy Anniversary stamped image would be too wide to fit on the 1 3/8" circle, so I used scotch tape to cover the word anniversary and stamped the word Happy in green, then covered happy and stamped Anniversary under it. I had to do this a few times to get an image that I liked.
The stippled blossom stamps are layered stamps but I did not care for how the second detailed layer was turning out. I stamped the base flower and used a darker marker to add some of the detail that would have appeared with the second stamp. I added yellow centers with a marker and green leaves also.
After these images and phrases were punched, I used a 1.5" circle punch with Watermelon Wonder paper to create a base or mat for these items. The two on the DSP don't align with anything, but the two on the white need to be visible through the windows on the side panels. Place a bit of adhesive or a glue dot on the back side and hold it in place over the white paper as you close the flap with the DSP to check for placement. You could also mark the area lightly with pencil if eyeballing this makes you nervous.


There is plenty of room on both white papers for handwritten sentiments or more stamps if you have something that fits your theme.
*** On to the front of the card.The original plan had the three papers described above to be layered with the Watermelon Wonder and DSP to the left side of the Old Olive rectangle. A large greeting stamped in a circle would be placed on the right side of this. Dawn neglected to give the size circle she used in her directions, but I didn't have a sentiment for that anyway. I layered the green, pink and lighter toned DSP on the front of the folded card. I didn't like it. I introduced white which meant I had to re-cut the green layer.
The white is cut at 4" x 5.25" and the green was trimmed down to 3.74" x 5". Here is that assembly.


Switching to the darker tones was something I liked but I need balance on the left side.


After trimming the width to 1/4", I was finally ready to call this card done.

No comments:
Post a Comment