Showing posts with label cards. Show all posts

Monday, August 5, 2024

Euchre Birthday Card

This card wasn't difficult, but it was fiddly to assemble. That isn't a negative comment, just a heads up to be patient and don't expect this to be done in 15 minutes. The die set used is Karen Burniston's House of Cards Pop-up  The playing cards used on the tower can be found here or possibly locally or on Amazon. Papers, the circular dies used on the front of the card and the alphabet dies are all from my stash. If I had been thinking about getting back into blogging (it has been 15 months since my previous post 😳), I would have noted what products I used. 

If you play Euchre, you'll recognize this as a perfect Euchre hand.  


Friday, September 17, 2021

Butterfly Card and (unrelated) a Baby Sweater

I've been making things but summer has flown and I don't seem to post much. I keep trying to get into using Instagram but it isn't "my thing", probably because I do much more on the PC than on a mobile device. 

This became a sympathy card for a neighbor whose mother had died. The inspiration was Jennifer McGuire's "Lined-Up Window Card" and her tutorial is HERE.


The stamps (Beautiful Butterflies stamp and die, sentiment is from Natural Silhouettes) and cardstock are from Gina K, the coloring was done with Prismacolor pencils

This sweater will be going to my son's coworker. It is a 12-month size pullover, pattern name is Cable Rings 5336 by Hayfield. This was knit with Snuggly DK weight yarn by Sirdar. The color isn't splotchy, it was drying when I photographed this. 


Saturday, June 26, 2021

C9 Summer Camp

Concord & 9th, a stamp and die company, just held their first large online class event. They called it C9 Summer Camp. Six well-known paper crafters served as camp counselors to registered members. The camp counselors were Kristna Werner and Lydia Fiedler teaching watercolor techniques; Laura Bassen and Cathy Zileske teaching Turnabout (a Concord & 9th patented stamp method); and Caly Person and Becky Roberts teaching 3-D papercrafts. Greg Cottrell of Concord & 9th acted as the camp counselor and host. All of the cardstock, stamps, dies, inks, and watercolors used in the items that follow were included in the kits sent to registered campers.

Watercolor classes were taught Friday evening. These two cards used the same stamp and colors, but the techniques were quite different. This class was Kristinia Werner's. I haven't added a sentiment to the first card yet as I am undecided. 

Lydia Fiedler showed us how to make gray paint from the shades of yellow, blue, and red used in the florals above. Amazing! The gray clouds and lake scene isn't finished because I haven't decided whether to add the intended canoe (a separate painted die cut) or so something else. Creating the clouds by daubing the still-wet paint with paper toweling was a great thing to learn. So was using a wet into wet technique to creat rust on the VW van. 

This morning's classes featured Turnabout stamps. Check this website here for Turnabout stamps, what is available and how they are used. Laura Bassen taught these cards. The second one isn't a Turnabout, but if you know Laura, you know she loves rainbow color arrays. 

Following Laura was Cathy Zielski who used the same stamp and dies in both cards but achieved a different feel. 
After a lunch break for me (there were campers from all over the world so it wasn't the same meal break for everyone), we had arts and crafts, beginning with Caly person and these cards that had the same card base but featured different settings. I haven't added sentiments here yet either. These do fold flat to fit into an envelope for mailing, but for the time being, they are decorating shelves in my house.
Last, but certainly not least, was this floral wreath, taught by Becky Roberts who is known for making 3D flowers. The wooden wreath frame is 6.5" in diameter. 
I thoroughly enjoyed each class and each of the instructors, both professionally and in the "campfire" moments when they shared a bit about themselves. 

Once upon a time, I enjoyed traveling to classes held a good way from my home, even far enough away that I flew to classes and spent nights in a hotel. Those days are over for a variety of reasons that are my choices. Being able to take classes from home these past two days was absolutely great! I would love to have met these women in person but I know how meeting them actually goes when you are face to face. It isn't just you and them, it is you and anywhere from 49-199 other people with the same goal of talking to them! 

I will definitely do this again if Concord & 9th offers another event, and am already looking at two other events that feature other instructors whose videos and blogs I've been following. 


Saturday, February 20, 2021

Valentines for my 3 guys and 1 girl

I spent a bit of time pondering how to make a Valentine Card for my 5 year old granddaughter who can't read most words yet. Connie Stewart from Simply Simple Stamping showcased this card fold on her site  (Click here) and I was sure Avery would like the layers to this card. I am currently in a sampler club from Scrapbook and Cards Today and that is where the birds and hearts print paper is from. The stamped birds on the front are from Lawn Fawn, the red and pink papers are from Stampin' Up.


Her brother is almost 11. He received this card with stamped images from the stamp set Hop, Flip, and Jump by My Favorite Things. The background was made with Gina K inks and cloud and grass stencils.
Their dad is my oldest son. Both he and his brother got cards made with die cuts from Sizzix/Tim Holtz. The first card used the man from The Park, the second card used The Gent

Other than the stamped sentiment on the MFT card, the cards for my guys only had a stamped Happy Valentine's Day greeting inside and then a personal note. 

Friday, August 28, 2020

Zoom meeting, Doxie style

One of my nieces has two dachshunds. She would have more, but she only has two hands. 😉 She has been working from home often and has had more Zoom meetings than usual lately. That fact and her love of Doxies led to the creation of this card.

The stamps are from two different sets by Newton's Nook, Delightful Doxies, and Dress Up Doxies (the superhero and taco costumes) but I only used a small part of six images to make 1.25" squares to resemble a Zoom meeting (hence the different backgrounds). The ID number over the computer screen represents her age and birthdate. I did the comments inside in Word. I can't wait to give this to her!


Friday, February 14, 2020

Happy Galentine's Day!

According to a report I heard on talk radio, Generation Z (born between 1995 and 2015) doesn't treat Valentine's Day as previous generations did. Many aren't in relationships but there is a new trend for women, and that is recognizing the value of their gal friend relationships. As a card maker, I don't spend much time in card aisles anymore so I don't know if companies like Hallmark are onto this, but at least one stamp maker is. Gina K Designs included a Happy Galentine's Day sentiment in this kit, called A Big Hello Card Kit. That greeting is in the upper right portion of this image. I didn't think to take a photo of the inside of any my cards. Oops! 
I realize that I forgot to photograph a few other designs in my rush to get them mailed. So much for using this blog to keep track of my work!

This sloth and the photo frame around is from MFT (My Favorite Things), the stamp is Picture Perfect, the frame die is called Polaroid Shaker Frame
This stamp and greeting set is also from MFT, named Close Knit.
These animals and sentiment are MFT's Sweater Weather on Safari.
This card has cats from Tim Holtz's Snarky Cat Collection stamped on colored cardstock and then attached to velum over a collection of stamped sentiments from various Dylusions sets.
With the velum lifted, you can read the sentiments underneath.
The dog was created with a Stampin' Up punch called Dog Builder. The heart balloons were die cut.
One more from MFT, this stamp set is called Seaside Gulls.
These calls were stamped from Art Impressions Uptown Girls which has 4 women in the grouping but I masked (blocked out) two of them.
The first three cards were colored with Prismacolor pencils, the last two were done with Copic markers. The images chosen were specifically chosen for each recipient. I hope they enjoy them, I had fun creating them. 

Tuesday, January 7, 2020

2019 Christmas Cards

I made 26 of these Santa with various finishes as cards. Each Santa had 57 separate pieces, not including the candy canes or gifts. This is a Tim Holtz Colorize die. Tim has announced this month that newer Colorize designs will have fewer pieces. Whew!


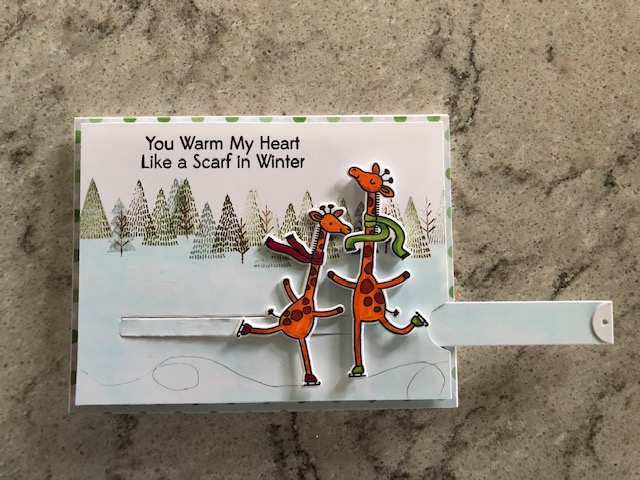
This card was for my giraffe loving niece, made with My Favorite things stamps and dies called Giraffes on Ice.  


This card used Honey Bee's House Builder Base and their Gingerbread Add On dies. 
These are called Impossible Poppers. They don't break open nor do they have a top that is removable. Instructions are here, at the Paper Pixie's website. I filled these with a variety of Hershey kisses. 
 

My great-nephews and great-niece get cash at Christmas. Here was this year's money holder design.
The gingerbread is on a belly band, holding the card closed.
Slip that off and here is the sentiment from Inky Antics Holiday Dough & S'mores
The gingerbread man was made using a Stampin' Up punch
Inside is the cash pocket
And one more message
The next five are from Christmas Selfies by MyFavorite Things


 Spellbinder dies named Poinsettia Pieces

 Two more Tim Holtz dies, Hanging Ornaments and Santa's Helper

And Ho Ho Deer Circle by Simon Says Stamp, the Merry Christmas greeting is a Tim Holtz die cut

I enjoyed making all of these cards but learned an expensive lesson. I knew the Santa cards were going to cost more to mail because they were square. I bought card blanks with matching envelopes labeled as being 6" square. That would have cost me 85 cents per card but the envelopes were actually 6 3/16" square which boosted the cost up to one dollar per card. I mailed 15 of them from inside a post office. A postal clerk applied the stamps and placed them in a mail bin. My receipt stated that they should arrive in two days. It took over 2 weeks for seven of them to begin reaching their destinations, the final eight never did. 

Other than that bad experience, the holidays were good and the cards were fun to make.