This birthday boy turned 15 this month. This is an awkward age as fifteen is too old for some things, too young for others. I don't think my card hit the mark but this sweet boy is polite and thanked me anyway.
I neglected to take a photo of the inside greeting which said Level Up in a bold font with Happy Birthday under that graphic. Both the stamps and dies are from My Favorite Things.
I have experimented with binding scrap paper into pads. Once upon a time, I had a jar of a pinkish red stuff specifically for that, but that is long gone and I am not inclined to hunt down another jar of that which was a rather large amount. I used a low melt glue gun instead. Low melt both for my safety (have you ever burned your fingertips on a hot melt gun?) and to lessen the possibility of setting fire to paper. Maybe that isn't likely but in my head it is. The scratchpad experiment worked but the glued edge isn't pretty. You do have to be careful in tearing single sheets off, but I don't find that any different than commercially made pads that sometimes tear rather than release.
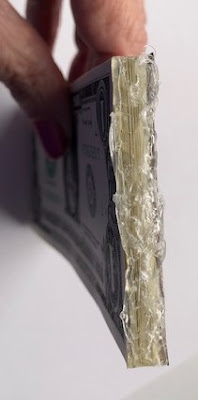
This project began with a stack of new bills. Their crispness prompted the birthday boy to ask if I had ironed them! 😄 I cut a piece of chipboard the size of a dollar, then squared up the stack of bills on the chipboard and clamped them together. I ran multiple lines of the glue along the edge and then tapped that edge against a silicone mat to make this less bumpy than the scratchpad test. That edge was still ugly and I did trim it a bit with a craft knife.
I covered both sides of the chipboard and added a contrasting paper to cover the binding. Double-sided tape (such as Sookwang, not merely Scotch brand) was used at first to hold the stack of bills to the binding, but the tape didn't adhere well to the bumpy area. I used a reliable liquid glue next, and even that wasn't perfect. This just had to survive the presentation though, I knew the money wouldn't stay in the book for long.
All that was left was decorate the cover which was black cardstock, no chipboard involved.
I have second-guessed my choice of paper for the initials but the birthday boy could read it. The arrows were added to cover up mistakes. 😞
The birthday boy thought this looked like a checkbook. Here he is experimenting with removing a bill that thankfully worked perfectly. He was happy and therefore, so was I.
To see other ways that I have given cash as a gift, go to the Search This Blog on the sidebar and enter "money as gifts".


