Did you play with a flat pieces of wood or plastic, strung together with ribbon in a toy commonly called Jacob's Ladder as a kid? I did. Why was that toy so fascinating? I think it is because kids like repetitive movement. Here is a quick view of the card in action.
I used a few sources when figuring out how to do this, both in print and online. I won't claim that my version is better than anyone else's so feel free to look for other directions for Jacob's Ladder Cards or mini-scrapbook albums. Just be forewarned when searching for Jacob's Ladder without any other clarification that there is body piercing known by this term that may not be suitable viewing for everyone.
Your squares (this is a figurative term, mine are not actually square in measure) need to have body to them. Some people use chipboard. That would have been a great choice except I decided to do this late on a Sunday night with no chip board in the house. I used multiple layers of black cardstock. The size isn't critical, you just want something that will comfortably fit in your hand. My squares are 4.25" x 3.5". I cut a total of 18. These six are double layers of cardstock, adhered together by double stick tape. My favorite is Scor Tape (Sookwang). I also used some very narrow Wonder Tape (the red stuff) when adhering the ribbon. We'll get to that in a minute.
I used six different black and cream prints from a paper stack that I've had for a few years, seen here. I cut the decorative paper at 4" x 3.25", cutting two of each design. One of each of these decorative papers was glued to a single layer of black cardstock, and one of each was glued to the double layers shown above.
I used a narrow satin ribbon to hold this all together without any problem. Other sites recommended grosgrain or organdy ribbon. Sometimes the beauty of starting a project on a Sunday night is that you use what you have on hand. Based on what I read at one site, I cut three lengths of ribbon that were double the length of the combined squares. Here are six squares laid out and one length of ribbon.
On each of the six double layer squares, I marked the middle of the square where ribbon would be glued, and a line that was a half inch away from each edge in the same direction.
I confess that I goofed and forgot to photograph the first step in the ribbon process. Hopefully a few pictures down from here will show what I am about to say.
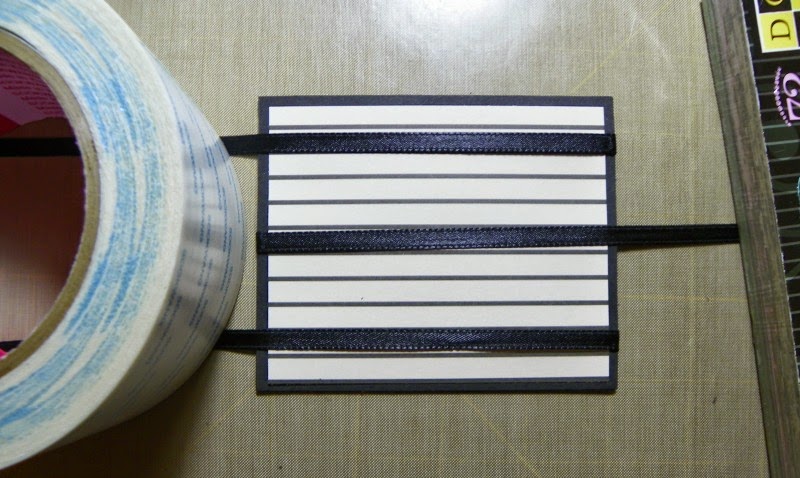
Picture the square in the above photo with glue, or in my case, Wonder tape along each of those three lines. The back side of this square already has decorative paper on it. I peeled off the tape's backing and laid the ribbons as follows: On the top line, the ribbon's edge began on the left side of the upper tape line, ran across the square and trailed off onto the right off the square. The ribbon on the bottom line ran the same way. The ribbon in the middle began on the right edge of the square, ran along the tape line and ran off the left side of the square. One of the single layers of cardstock with decorative paper was glued on top of this. Here is what that looked like.
Here is the next double sided piece of cardstock with decorative paper added:
And here is the taped side where ribbon will go:
After the first panel is completed, the ribbons need to be folded over the square and head off in opposite directions. Tape and the paper pack are weighing down the ribbons in this next photo to make things easier to see.
I peeled off one piece of double sided tape at at time and brought the ribbon over the exposed tape. This is how the first piece that I forgot to photograph looked. The only difference in the original layer was raw edges of ribbon on the upper and lower left, and on the middle at the right.
It is important to keep the ribbons flat and not twisted. There should be some tension and you wrap the ribbon and adhere it, but not so much that you cause anything to buckle.
Another single layer of black cardstock with decorative paper is glued on top of the ribboned square.
Here are the first two squares attached and open like a book.
Closing the right hand page of this book analogy, the striated paper with sparkle will be on top. The steps are repeated with the remaining tiles.
- Cross ribbons over newly finished square
- Expose tape on double thickness square
- Keep ribbon flat, apply some tension, and adhere ribbon across the taped square
- Cover this with a single thickness of cardstock with decorative paper added.
Before I show you the last step, I'm going to guess that nobody noticed what I did wrong in the beginning. In the third still photo, I showed you the squares lined up and the double length of ribbon that was cut. I had the squares oriented so that they were taller than they were wide.
In the next photo, where I showed you the lines I drew for tape placement, I changed orientation. The squares were now wider than tall.
Uh-oh....
Here us the last square waiting for ribbon placement with very little ribbon left to glue down! This wouldn't have happened if I hadn't changed orientation.
Fortunately there seems to have been enough, plus I used more tape on the final panel than the others, hoping to be sure to secure those ribbon ends. So far, so good!
The more you play with this, the more freely the movement will occur.
This is going to become a birthday card with a few photos and sentiments added. As long as I don't go crazy and use anything too thick, it should be fine.
I will definitely make this again but I will probably limit color and pattern to two simple choices, especially with the goal of adding photos. If I had made each double cardstock thickness square the same, let's say plain black, and each single thickness trimmed with the dotted paper, the view in the video or in this photo would show alternating black and dotted squares.
All in all, not bad for a Sunday night.