I recently made this card with items from Hero Arts' Monthly Kit for February 2019. The Happy Anniversary sentiment is from another source. That greeting and the inside sentiment and image were embossed with gold powder. The car in the bottom photo was simply stamped in black on an envelope.
I have really enjoyed all the components of this kit. The black die cut on that shiny gold paper made me happy but was difficult to photograph. I was wearing a red plaid shirt the day I took the photos and I kept showing up in them. Oops!
Showing posts with label Anniversary cards. Show all posts
Saturday, March 23, 2019
Wednesday, July 4, 2018
Koi stamp used for an anniversary card
I've had the Hero Arts Color Layering Koi stamp set for a while but didn't use it until yesterday when I made an anniversary card.
It was not difficult to use and while my layering was not perfect, it wasn't off by much and I liked the result.
My first layer was stamped with Stampin' Up's Daffodil Delight ink, the second layer was Stampin' Up's Peekaboo Peach, the third layer was a Hero Arts ink cube that came in a kit and I don't know the name. It was a reddish orange which I lightly stamped on scrap paper before bringing it to the fish. Black was used on the small stamp for the eyes and mouth. The seaweed (?) is from another Hero Arts stamp, Color Layering Goldfish. I used Stampin' Up Lost Lagoon ink on the seaweed, some full strength, some stamped onto scrap paper first.
The koi were mounted on Lost Lagoon cardstock, then placed on the card base. The front of the card was stamped in Lost Lagoon ink on Simon Says Stamp's Beach Waves.
The inside of the card simply says Happy Anniversary with room for a personal message. I liked the peace, harmony and love sentiment from the koi set. I considered adding "wishing you" at the top of the card but preferred just the clear bubble embellishments.
Saturday, July 1, 2017
Die-ing to have fun
Yes, that pun is pretty bad but for those who know me well, a bad pun is to be expected. 
My city's firework display was scheduled to happen last night but bad weather intervened. With a 24-hour delay, what was I to do? Knit and make cards! The current knitting project is still a work in progress and doesn't look like much in a photo yet but the cards are done.
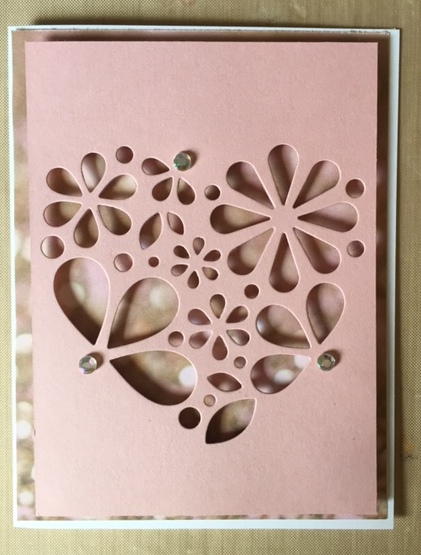
I began with these two dies with the intention of making two anniversary cards.
After cutting out the heart from Stampin' Up's Blushing Bride cardstock, I saved the pieces and used the cut out as a template on a plain white card.
I lightly traced the openings and used Tombow liquid glue to adhere the pink pieces on the white card. That is glue that you see in the photo below.
The white card still needed something but I didn't think crystals were the answer here.
Wink of Stella to the rescue! I added clear Wink of Stella to each of the pink petals and dots and also three circles of it to the other card. Wink of Stella is subtle and hard to capture in a photo but it does look very nice when seen in person.
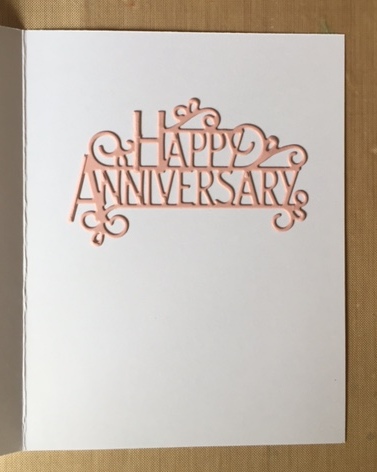
The inside greeting is the same in both cards. I used double sided tape on the designer paper for the first card and on pink for the second. I ran in through my Big Shot a few times before working with the greeting.
The greeting on the left is done with the designer paper, the right is plain pink.

My city's firework display was scheduled to happen last night but bad weather intervened. With a 24-hour delay, what was I to do? Knit and make cards! The current knitting project is still a work in progress and doesn't look like much in a photo yet but the cards are done.
I began with these two dies with the intention of making two anniversary cards.
I lightly traced the openings and used Tombow liquid glue to adhere the pink pieces on the white card. That is glue that you see in the photo below.
I used Stampin' Up designer paper from the Falling In Love collection under the pink heart. The pink cardstock is elevated by thick dimensionals and I added three crystals for a little pizzazz.
The white card still needed something but I didn't think crystals were the answer here.
Wink of Stella to the rescue! I added clear Wink of Stella to each of the pink petals and dots and also three circles of it to the other card. Wink of Stella is subtle and hard to capture in a photo but it does look very nice when seen in person.
The inside greeting is the same in both cards. I used double sided tape on the designer paper for the first card and on pink for the second. I ran in through my Big Shot a few times before working with the greeting.
Remember to turn the paper over and use the die on the correct side of the paper unless you like reading your greeting backward.
I enjoyed making these cards. Working with the leftover pieces to create a negative image is fun and easy to achieve with liquid glue.
Friday, June 2, 2017
Two Anniversary Cards with almost one die cutting
I made two anniversary cards using Stampin' Up's Rose Garden thinlits die. My idea is not new, I've seen it many times on Pinterest and elsewhere. I'm just recording it here for my sake and to let anyone who reads this know that it was very easy to do.
I'm happy to have two cards for one session of work, and like both the positive and negative looks equally well.
I used a scrap of red that may have been Bazzill cardstock. It had a good weight to it and a bit of texture.
Beginning with the card on the right, before tapping out the pieces from the red paper after cutting them, I placed the die on the second card front and used a pencil to draw lines within the die's openings to indicate where I would be gluing the petal pieces. The cut paper pieces were slightly larger than the pencil lines so there was no worry of lines showing and needing to be erased. I used Tombow glue, sometimes applying glue to the card, sometimes applying it to the back of the red petals. I began with the smaller pieces, tapping out just a few at a time, gluing them and repeating the process. Reading this took longer than actually doing it.
I then switched and worked on the card on the left, gluing the rose cutout onto the card front with the same glue. The remaining piece of red card stock from the die cutting gave me that perfect outline for the red area of the card, it just needed to be squared off to match the white cardstock's dimensions. I used a tape runner to add this.
Back to the card on the right, I wanted a similar outlined edge but had very little of the red cardstock left. I placed the die on it, maximizing what I could salvage of the leftover cardstock and got the shape seen above. It wasn't perfect and I decided it looked better with a wider margin which mimicked the negative space created by the die itself.
Despite having a lot of stamps, I don't have many with anniversary greetings. I wanted to use this label shape, also from the Rose Garden die set, but the only greeting that fit inside was this one. It is from Stamps of Life's Anniversary 2 Celebrate set. I used a Real Red stamp pad from Stampin' Up for the words and ran the side of a red Tombow marker around the edge of the die cut label.
Tuesday, August 9, 2016
Dragonflies and Anniversaries
Two recent die purchases were this Dragonfly die set from Technique Tuesday and the words Happy Anniversary from Tonic Studios:
Anniversary greetings, both stamps and dies, aren't as prevalent as birthday greetings which I understand. There are more occasions to give birthday cards than anniversaries. Throw in personal tastes and the choices becomes even more limited. The dragonflies certainly won't be limited to anniversary cards, this is just their debut from my craft room. That Tonic Studio die of Happy Anniversary is going to get a lot of use. I really like the style and size.
I began with the top two cards. they were going to identical but they didn't turn out that way. The dragonfly base and the lacy overlay are matched pairs on each card rather than one with yellow lace and one with coral lace on each. Matched pairs seemed less busy.
The rather nondescript background blobs are bits of glow in the dark glitter. That came about when some accidental glue smears were way too noticeable, despite being clear. It doesn't show well in these photos against the black surface, but the blue cardstock has a white mat and is mounted onto a light green card base. The card interiors have a white area for the greeting with three small hearts cut from the blue paper adhered along the lower left edge.
The purple card used up my last scrap of butterfly paper, a small print on black from Stampin' Up. The base dragonflies, the greeting and the mat between the blue paper and white card base are from Stampin' Up, the color is Wisteria Wonder. I outlined the greeting with a white Signo pen and added dashes to mark the flight of these dragonflies.
Subscribe to:
Posts (Atom)