Showing posts with label Sizzix. Show all posts

Thursday, February 3, 2022

Lunar New Year, Sympathy, and other card components

January didn't produce as much as I had hoped, craft-wise, but if I look at the experimenting that I did with paper arts and the continued knitting, I haven't done badly. 

Sympathy cards are always difficult if you are making them when you need them. Not only do you feel a time crunch, but you are also emotionally involved which can delay or derail your creativity. I made this one using Gina K's Friendly Silhouettes which were from an online class where she was a guest instructor. There are other tree stamps that are similar. 

Playing with products produced this tree, a new purchase because it was on sale and I liked the layers of the Sizzix die set called Layered Christmas Tree, number 664712. I used white glitter paper for the snow and Stickles for the ornaments. 

A Jennifer McGuire video inspired me to apply ink to a stencil and run the stencil and paper through a die cutting machine as if you were embossing the paper. The embossing effort didn't go well due to user error while I become familiar with how my new machine works. This stencil, Bold Layering Stencils by Gina K would normally produce colored flowers on white paper or a colored paper of your choice which might limit the colors of ink you could use for the flowers. Yellow ink, for instance, over blue card stock would probably give you a green flower that was not your intention. Here is the link to Jennifer McGuire's Stencil Ink Press Technique

February 1st was the start of the Lunar New Year. I made this card for my neighbor, welcoming the Year of the Tiger. I used gold ink on red cardstock and a stencil called Lunar Lanterns by Clearly Besotted. The playful tiger images were prints that I cut and adhered inside and out. 


Thursday, November 8, 2018

Floating Doxie Card

Before the card info, a short explanation on the end of the Be Thankful For challenge. I am not unthankful, I just can't write about specific prompts on specific days. My inner voice said not to start this but the bulk of me prodded me to try. Losing two days to a migraine headache put me behind on more than the challenge. Since I don't need artificially induced stress, I'm back to cards and crafts.

I made this card for a friend's birthday. Her dachshund is an important part of her world. She lives in Florida where things grow and bloom much longer than here in Michigan. Also, she has a pool. Combine those elements and this is the card that I made. 
People who stamp and make cards know about masking part of an image when combining two or more stamps. I was going to use that technique but the inner tube wasn't quite the right size for the doxie image. 

These are the stamp sets I used: Newton's Nook Dress Up Doxies; Newton's Nook Floaty Goat; and Simon Says Stamp's Showers and Flowers
 

Each of the stamp sets are clear. I didn't stamp the "hot dog" doxie, the inner tube, or the umbrella, I traced them. I held plain copy paper over the first image to a window and lightly traced the dog's head with ears extended. I roughly drew the inner tube and adjusted it for size before adding the umbrella. 

I could have drawn all of this but this was quicker and I liked each element as is. I didn't need to reinvent the wheel. I cleaned up the sketchiness of my image and outlined it with a Copic Multiliner. The angle of the dog's hind legs is the same as the goat's but I shortened them and didn't trace the hooves. The front legs might be a bit too short in comparison, but this is a card, not an anatomy illustration. 

The image is colored with Copics. A black gelly roll pen was used on the nose and a clear gelly roll pen was used on the inner tube. I cut the image out and glued it to paper from my stash that I felt looked like pool water. Here is the image before fussy cutting, and the pool paper behind it. 
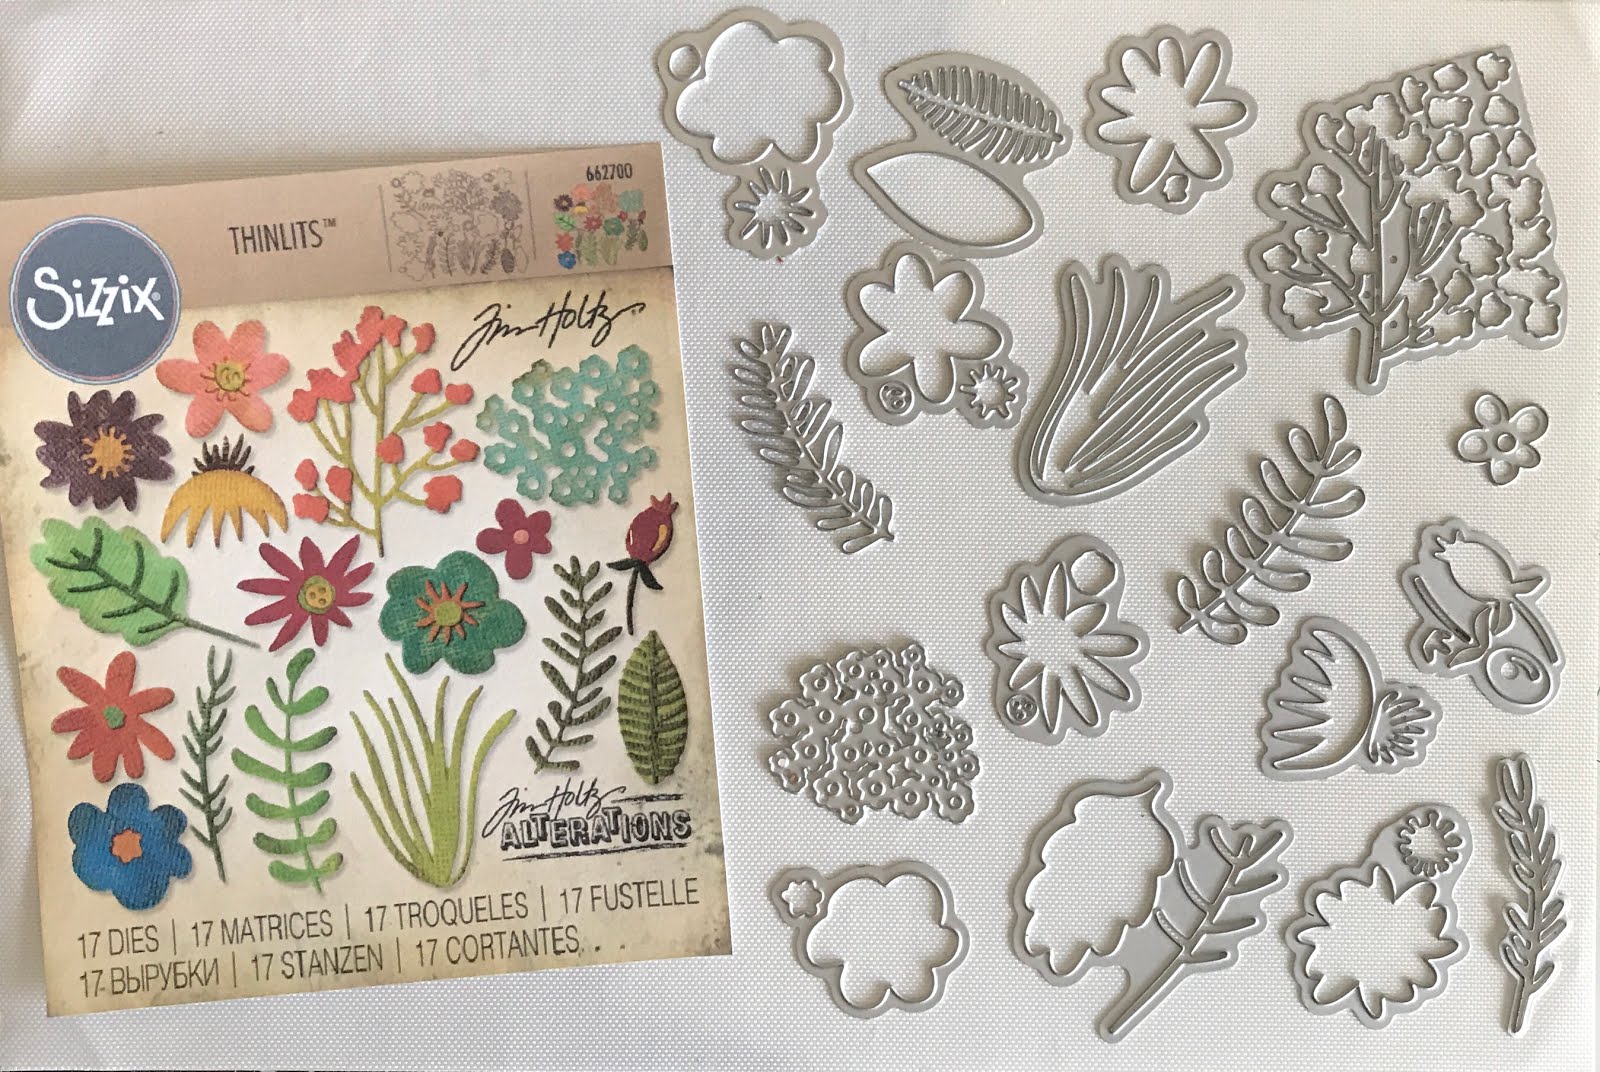
I had a cute image going, but it wasn't quite enough for the front of the card. Tim Holtz and Sizzix to the rescue! I used Funky Flowers #1 die set to make the foilage that frames the image. 
I like how this turned out. If you are interested in doing something like this, here is a MAJOR tip for you. If you have a scanner, copy your completed image just before coloring. When I use this again, I will adjust the color so that it prints in a light gray tone. I'd rather darken the lines myself with a marker after coloring a printed image. Besides not needing to do the work behind this composition again, I can enlarge it if I want. I don't have "fancy" programs to do that, I put the image in Word and enlarge it before printing. My Brother printer, scanner and copier combo handles Copic friendly paper well. 


Tuesday, November 14, 2017

Halloween Cards

Better late than never when it comes to recording Halloween cards that I made this year. This first one was actually a combo birthday and anniversary card. The witch and cat are a Tim Holtz die for Sizzix,  Witchcraft #662386


The Boo! cards were done with Stampin Up's large letter dies. The treat bag between them is a die from Lawn Fawn, Goodie Bag LF771


I wrote about this next card in detail here. This card used dies from Karen Burniston.
The ghost and word with Boo on a banner with a spider hanging from it are from Karen Burniston. The letters that open on the front of this card are from Hinged Alphabet by Julie Ebersole for Essentials by Ellen (Ellen Hutson),  EEDIEJ-079-17.

I used the same paper that lined the inside of the black card to make the front of this shaker card. I used the punched circle on the inside greeting of the card. The black cat is a die that matches Simon Says Stamp's Creepy Cute stamp set.


 This die is also Tim Holtz for Sizzix, Haunted House 662378
The paper cuts inside are also from Tim Holtz. The mechanism that makes them pop up in the center is the Karen Burniston Flower Pot Pop Up set, # 1010


Monday, August 22, 2016

Calendaring...like journaling, but on a refrigerator

I have seen many cute ideas for journals but I'm a calendar girl. Wait....anyone hearing Neil Sedaka singing? No?  Well, I was too young for good ole Neil in 1960 when that song was recorded and I have never been the pin up calendar type. When I say I'm a calendar girl, I mean my refrigerator is Mission Control with everything important entered on the calendar that hangs on the freezer door. Recurring events and appointments also go in my iPhone, but after decades of looking to the fridge for guidance, the habit is not likely to be broken now.

Hmmmm, looking to the fridge for guidance may have led to my weight issues but that is a different story entirely!

A few years ago I had a calendar kit from a store that no longer exists in brick and mortar reality. That calendar was a mix of colors, textures, photos and anything you could think to add to a page. The problem was the thickness of the completed project. It could never go on the fridge. All of the layered embellishments meant the pages stood away from the door at nearly a 45 degree angle. Forget ever scribbling a note on a calendar page with a phone in the crook of your neck. That calendar languished on my desk, occasionally looked at but never really used.

I bought a Cambridge calendar by Mead at Target. The overall size is listed at 14 7/8 inches by 11 7/8 inches. The individual dated boxes are 1 7/8" square. One plus to this calendar is that the squares are roomy for writing in appointments and there aren't pictures in any of the squares or decorating a border. This is good for self expression. A negative is that the paper is very thin. I'm lucky that the first page I decorated did not bleed through to the underlying month. I'm now using cardboard between pages as I stamp and color them. This calendar runs from June 2016 through June 2017. I thought it was an 18 month calendar when I bought it and didn't realize this until I had already started decorating. Oh well.....

I began with September, a month with a few family birthdays and anniversaries. The first attempt at stamping "Happy Birthday" directly onto the calendar page did not go well. I'm blaming it on the stamp being brand new and the ink not covering well. Starting out with a mistake freed me from the pressure of perfection. This was going to be a functional calendar with some fun and color in it, not a museum worthy piece of art!

The fifth is my wedding anniversary. I started out stamping the word anniversary and the heart from a BoBunny collection called Icons.  This was too small to suit me. I added the cactus, pot and sentiment from My Favorite things Sweet Succulents and colored them with Prismacolor pencils.
Yours truly has a birthday next month. The leaf is a leftover from a project that hasn't been finished yet. Since the 22nd is the first day of autumn, it seemed appropriate to stick it here. For the record, I was born in the early hours of the day when it was still summer. Summer is my favorite season. Fall would be okay if it didn't lead to you-know-what. The sentiment about treating me like a queen is from an Art Impressions set called The Queen.
October has a few good things going for it, including my son and daughter-in-law's anniversary; the anniversary of dear friends on the 14th (that greeting in blue is part of an anniversary set by the Stamps of Life); a night out with friends to see Jeanne Robertson; and Halloween. The dazzling damsels represent my once a month dinner buddies. Our initials are T, L and C. We were meant to be together, right?  This stamp set is Flaunt It by Art Impressions. The markers used are Zig Clear Color markers. 
Halloween is a big event for me and could have its own page if I had designed the calendar but alas, October is one of those months where a few dates share a space and Halloween got shortened. The word Boo and the bat are from Inky Antics Creepy Crew. The Jack O'Lantern is an orange marker from Zig but I didn't want to do the bat in black and lose the detail. I used Prismacolor pencils, first a layer of chartreuse, then Warm Gray 90%, and finally a layer of Slate Gray. I have no idea why I chose those colors other than experimenting on something like this is fun. There isn't going to be a "wrong" and if it went really badly, I would have stamped another image, colored it, cut it out and glued it in place. Everything in life should be so easy!
November is saved from doldrums by Thanksgiving and my sweet daughter-in-law's birthday. Sometimes that order changes since turkey-fest changes dates. The turkey stamp is Gobble, Gobble by Your Next stamp. The cupcake is one cupcake cut from an image of 6 cupcakes on a tiered stand, Cupcake Greetings by Sizzix.
December has a few more birthdays and of course, the jolly old guy who arrives at the end of the month. The stamp I used is Jolly Santa by Woodware Clear Magic Singles. His image prints with a solid square border. I wiped off some of the ink before stamping but not all of that border. I added the two ornaments to cover areas that were too visible to ignore but not visible enough to look like anything. The ornaments are from Clearly Besotted Laugh Out Loud: Christmas. The ornaments and the red hat are Zig markers, the face, facial hair and skin are colored pencil. The facial hair has a light base coat of cool gray pencil, the fur on the hat has warm gray. Over both I used white Signo Ball pen, done in squiggly lines to represent fur and hair. The silver dots on the purple ornament at the hanging device of each ornament was done with a silver pen, also Signo brand. The lens of Santa's glasses have very light blue coloring (pencil) under a coat of clear gel pen (Glaze) by Sakura. 
Appointments are being added in plain pencil as we all know they sometimes change. I have numerous markers and many aren't used often as I forget about them. I have a database of my stamps, dies and punches. Don't roll your eyes....I like data bases. I have binders with photos of my stamps. This is easier for me to flip through when I'm trying to decide what birthday image to use for a card or wondering if any set has elongated star or a perfect sentiment that I might want to emboss rather than write by hand. 

I'm having fun doing this. Let's face it, most of us aren't going to save the world in a dramatic way, but we can enjoy ourselves and spread cheer with what we do. Some of us plant beautiful flowers (I have a black thumb and it isn't from ink!). Some of us cook magnificently.  I can bake sweets like nobody's business but try to avoid that since being successful on Weight Watchers. Some of us sing so beautifully, people would pay to hear us. People would pay me to remain quiet. 

If I'm creating something to share, I am hopefully bringing a smile to two people, the recipient and myself. If I am creating something for me, I am happy in my own little world where the ugliness that all too often fills the news is kept at bay. To quote Martha Stewart, it's a good thing. 

Sunday, March 22, 2015

Happy Birthday Card

This card is to die for.....or wait....maybe that should read this die is to card for?  Confused? Let's start with the finished card. Isn't it cute?
It began with Stephanie Barnard's Happy Birthday Step-Ups Die Set, Sizzix # 660142. It is a 19 piece Framelit die that looks like this:
Once you've chosen your papers, the rest is easy peasy.

Here are the components. That bit of yellow at the top is twine that matches the bows on the right. The white letters were adhered before I took the photo. No special technique, I just used a tape runner over the back of the words. I like that they are all connected rather than individually gluing each letter.
Here are components assembled and ready to go on the card. I used a marker on the presents and scribbled some color on three of the four bows.
I used pop dots on the gifts and cupcakes, glue dots on the ends of the twine that hold the banner and under the bows at the end of the string.  For no particular reason, rather than cutting the pennants with the die, I used the tree punch from  Stampin' Up and a standard (small) hole punch.

This die is going to get a lot of use and with my horde ...abundance ... collection of other small dies and stamps to decorate the panel on the left, I will be able to vary the designs.


Tuesday, October 14, 2014

A Birthday-Anniversary card

I have a friend who was married on her birthday. Do you think she did this to make it easier for her husband to remember dates? 

This is the prototype of the card I made for her. I should have taken a photo of the actual card with sentiments complete but all of a sudden it was time to finish and mail it and I don't know how that happened. I wish whoever plays with my clock and calendar would stop this! 

* Ahem *   Now that I've shifted to blame to Mr Nobody, on with the card.

I used Sizzix Circle Flip-its die #657586 on white cardstock. The coordinating papers are flip sides of double sided paper from Doodlebug that came in a 6 x 6 pad. The camper is a stamp from Art Impressions called Camper Set (#0651) and the lady with the watering can is from their Gardeners Set (#0650). I believe both of those sets were made exclusively for Michaels.

My friend recently bought an old camper which she is restoring. She also likes to garden, hence my graphic choices.


Hmmm, apparently the light changed in the few minutes between taking these photos. The accurate color is somewhere between the two.

The scalloped circle frame was cut with two sizes of Spellbinders Classic Scallop Circles dies (S4-125) used on Sizzix's magnetic platform. Both images were colored with Copic markers.

Saturday, September 13, 2014

Perfecting Techniques: Choosing paper for cards

I liked this card as soon as I saw it online. It is cut from Sizzix die #659690. This die cuts the entire card, not just the face the that you see here. A crease is made for folding as the card is cut.
I have quite a few Christmas prints, but the paper is lightweight. This was not a good choice. The card had no body and the word jingle did not release well. I tried gluing the thin paper over a ready made blank card. That didn't go well either. The print paper tore along the crease as I trying to align things.

I ran this die again but cut the print paper in half after the card was cut. If I am going to use up the thin paper that I have on hand, I think I will try shimming under the work jingle before I run it through the Big Shot and see how that goes. It took quite a bit of time to get the word out and salvage the letters that came out in four pieces: the j-i are one piece, the n-g-l-e remain connected and then there are the two dots for the first two letters.
The phrase "all the way" as shown in the first photo does not come with the die. I will probably use the phrase on the interior of the card, either printed on the computer or free-handing the greeting. The two views in the above photo are not finished cards. They need to be glued to a card and I'm not certain of the use of the bell for the dot over the "i". If I use them, these cards will be hand delivered.

Next experiment will be cutting this out of solid core card stock in Christmasy colors (I hate have white show in the fold when the card is creased) and using a Christmas print on the interior of the card that will be visible through the jingle cut out. The front of that card might be too fragile though. Hmm, see why experimentation is necessary?

***Update***

Using a heavier weight card stock made removing and saving the letters much easier.
I decided the card needs a backing and shouldn't be used as a window to the interior of the card. 
What was the first thing I did today? Cut the card out of the lightweight paper...again. 
The bell here is white with glitter on it. I outlined the letters with a Sakura pen called Star glaze. Another bit of advice: If you decide to add a bell, make sure it has a clapper inside. This one is a dud and I didn't notice it until I had it on the card. Maybe I wasn't really awake this morning. 


Wednesday, August 27, 2014

Easel cards

Sometimes I get excited over things that I'm sure make others wonder what the heck....

I've been liking easel cards lately. So much so that I bought a Sizzix die to make this easel card. The die is # 659211, called the Regal Stand-up.


The layers of the flower were cut from Sizzix Triplits #659608.  The lace border was made with a Martha Stewart Punch. 

You can barely tell in this next photo that the card is propped up in place by a small cut in a shape that reminds me more of a thumbnail impression than a half-moon.


I probably should have taken another photo from a different angle before I mailed it. I wrote anniversary greetings on the inside (opposite side of the the light pink floral paper) and have been thinking that this card could be a fun way to share good wishes and positive affirmations to someone. I can see having a phrase like "You can do it!" on the front where the lace is, with a handwritten message inside that might encourage someone.

I can also see the points on the medallion becoming a spider web for a Halloween greeting.