Tuesday, December 30, 2014

Animal hangovers

No craft today, I haven't done much worth sharing and what I did do (rushing to finish Christmas cards), I forgot to photograph. Until I get back in the swing of crafting and writing about it, here are some animals that would appear to be suffering hangovers. I don't plan to look like any of them on January 1st.


Thursday, December 4, 2014

Christmas Poppers

If you have paper, an envelope punch board and Nugget or Treasure candies, you are ready to make these cute poppers. You could cut the notches without the punch board, but having one and also having a scoring board makes this project really easy.

Here is the popper. While it doesn't actually  * Pop! *  it is reminiscent of them and makes a cute item to add to a stocking or use at place settings.


Begin with paper that is 6.5 by 4.5 inches. This is the size in many pads of paper sold in the scrapbook paper aisles of craft stores and what I used today.

Begin by scoring the paper at 1", 1.5", 2", 4.5", 5" and 5.5"


Turn your paper so that the shorter width is at the top of your scoring board and score at 1", 2", 3" and 4".

Now to the envelope punch board. With the 6.5" side of the paper parallel to the top of the punch board, you are going to punch each folded edge at the 1.5 mark on the envelope punch board, where my finger is pointing.


Turn the paper over and repeat this at the other edge. 


You will repeat this on each fold, at each side.


You will also punch this notch on the unfolded side of the last panel that is one inch wide. This is what you will have when done with the envelope punch board.


The plain side might be easier to see


I bought the variety pack of Hershey nuggets to fill the poppers. Four fit in each one, nestled as shown by that old lady's hand my hand. (when did my hand get so wrinkly?) I used a tape runner on the narrow edge (the bottom edge in the above photo) on the print (right) side of the paper, and closed the tube with that edge fitting under the full one inch panel at the top. 


Once the candies are inside, the creases on either end of this tube will nicely squish down into a popper shape. I used 10" lengths of ribbon to tie off each end.


Aren't they cute? Wouldn't they be nice on a table with names added to use as place cards? Maybe the Christmas Elf that visits so many children every morning in December could surprise a child with one of these.

Sunday, November 30, 2014

Sock Monkey birthday card

A nephew has a birthday approaching that once sounded old to me. It has two fours in it, and he isn't turning eight. Not many ages sound old to me now, certainly none in the 60-range! 

When this nephew was a little boy, one of his favorite toys was a sock monkey. Everyone knows what a sock monkey is, right?

Thanksgiving was just a few days ago, and some of the talk was of days gone by. Sock monkey wasn't discussed but I thought of him this morning while looking at December's birthday list on my calendar. I decided to make a sock monkey card.


The proportions aren't perfect, this monkey is a little thick in the middle, but many of us in double digit birthdays past 20-something know that this sometimes happens. I think it occurs while we sleep.

I would have loved to found or created paper that had the look of the actual socks used to make sock monkeys, but this guy is recognizable and will hopefully bring a smile to our nephew.

He was made with Stampin' Up punches except for the oval body which is from a set of nested oval dies. I trimmed down the sides by hand and perhaps should have made him thinner (oh that it were so easy for my body!) but I liked his head this way and a thin body made him look top heavy.

The head was cut from a 1 3/4" Circle punch #119850.
Ears are the Small Oval #120908, cut in half.
The muzzle was cut from the Extra-Large Oval #119859 and trimmed to make it somewhat narrower on the top and bottom.
His mouth was done by punching a thin slice of red with the Extra-Large Oval at the edge of a sheet paper, then punching again over that edge that had the slice missing.
Arms and legs are Word Window #119857.
The tail was cut to the same width as the Word Window cut, but free handed around a circle that had been cut from the brown paper.
Eyes are from the Owl Builder punch #118074.
His hat was made with the Tree punch #135859, Word Window for the brim, and Boho Blossoms #119858 for the pompom.

The balloons were cut from the Small Oval punch with the foot part of the Owl Builder used as the balloon knots. The balloons are attached with pop dots, and a glue dot behind sock monkey's hand is holding the strings.

Saturday, November 29, 2014

Jingle Cards

I have a progressive party coming up in our neighborhood, a perfect time to hand deliver our holiday greetings. I used this Sizzix die to cut the word Jingle. I didn't create the whole card with the die, just the layer to apply to card fronts. I saved the cut out word to make a second card from each cut. Small jingle bells were attached and a handwritten message finished off the inside of the cards. I originally wrote about these cards here back in September. Why did I wait until now to finish them? Don't most of us work best at the last minute?

Here are the cards, positive and negative cuts used, mostly with the same accent paper in each pair.


The bells are attached with glue dots which wouldn't make for friendly mailing, but I think the kids of the neighborhood will like them.

Wednesday, November 26, 2014

Popping color with intensity and dimension

I made this card for my daughter-in-law's birthday. I really enjoyed coloring this and like the finished card.
I stamped the image, scanned it and then printed it twice on X-Press It paper. The image that became the under layer has hints of the Copic colors I used in the upper image. The bottom shades were done with Color Box chalk inkpads in Olive Pastel, Azurite and Bisque.
I used both blue-green and blue shades of Copic markers in the background. Originally I planned to fussy cut more than this, but I wanted more of the background color to show. I really the blue-green shade.

I ran a black marker along the cut edges of the flowers before adding dimensional dots and lining up the cut image over the full image which is matted on black and then green.
I thought it still needed a bit more something, so I added a few lines of star glaze on some of the petals and dots of clear glaze on parts of the centers.
Before matting the under layer, I tested how the colorful layer was going to look and decided to cut the bottom layer smaller. That little bit of petals overlapping the black mat adds a bit more depth. I will definitely use this idea again.

Friday, November 21, 2014

Cards (and opinions) from a shop hop

Last week I went on a three store shop hop of scrapbooking stores. I knew one store would have good projects and was hopeful for the other two but they left much to be desired, for my taste at least. The fee for this hop was $12. Each shop hopper would have 9 cards or projects at the end of this. 

The first store had very limited work space. I wouldn't hold that against them except each person needed to get up at least three time to go to another area to heat set ink on glossy paper and to emboss gold powder. My strong objection came when I was almost done with the card done on glossy paper. After stamping and heat setting the cabin image, ink from a stamp pad was smeared onto the sky and water. This image is very pale, not by design but because the ink pads weren't very juicy. The upper image of pine needles was added after coloring, heat set and then we were to turn the image over, apply a tape runner and mount this onto black card stock, then onto a card. 
See the smudges along the left side and the big one in the sky over the cabin? Also the yellow cast in the center? That is all from the dirty surface we worked on. When the woman next to me and I both encountered this, we were told to look at this as a design challenge. I don't think so. I would accept that if we had done something incorrectly, but not because their work area wasn't clean. They could have and should have offered us fresh paper to start this again. 

The other two projects from this store are below. The trees are done as directed. I finished the dove card at home, using a Peace stamp and Wow glitter embossing powder. The blue area is a sheet of blue paper under a piece of called Vertigo by Tsukineko.
 
The second store had a small work area too, but once seated we were fine. I was disappointed in the supplies they provided for their projects. One project was a box card design. The second card in this post is an example of box cards that I have made. The paper they used was very flimsy and unattractive. So much so, I didn't even take a photograph of it, nor did I salvage any of the embellishments.  The second card wasn't much better. It came home unassembled, but this is the layout.
Are you wondering what those circles are supposed to be? They are supposed to be ornaments.  The third project wasn't a Christmas card (even though this was a holiday hop), but your choice of card kits that had been for sale. I won't say anything else, other than I didn't purchase anything at this store either.

The third store got it right. Their projects were much more creative and supplies were of good quality. First is a card that will hold a gift card or cash. The color is off a bit, the nose and bow are actually red, not pink.
When you open/tilt the reindeer's head, there is a piece of card stock that slides up which is where the cash or gift card would go. 
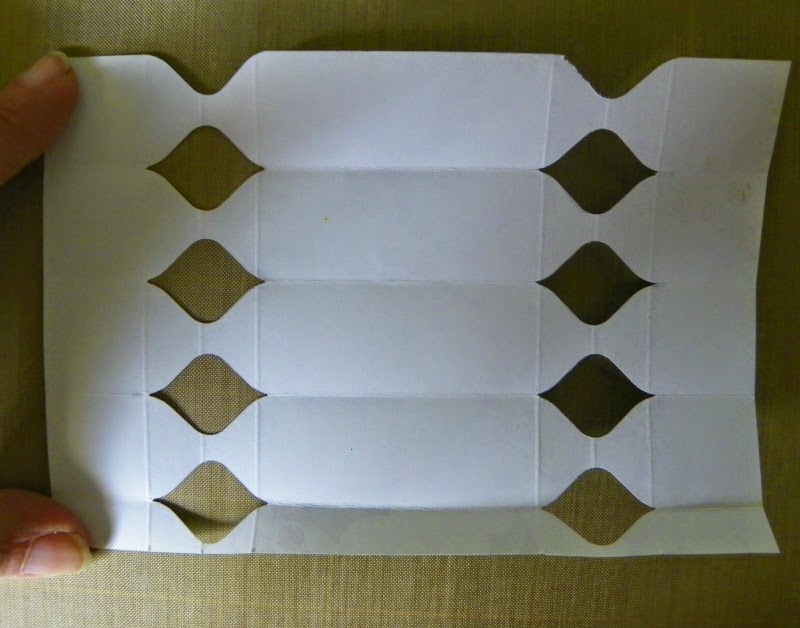
I think this next card is the cutest thing ever! I don't have the front finished yet (print paper cut to fit over the white card) because I haven't decided which paper to use.  I call this a magic card and my grandson is going to love it because he says "magic, magic, make {fill in the blank} appear" and this will absolutely work with that command.

I'll write about how to create this at a later date, but for now, here is the magic card. The snowman goes from uncolored, to colored!
  
The third project from this store wasn't a card, but greetings could be added to make this a gift presentation and card all in one. This is what I made in the store, complete with hot chocolate mix and a candy cane from them. 
This is very simple. A 12" sheet of double sided paper is all you need. No tape, no glue, no scissors. 
 
 First fold your square into a triangle.
 Bring one lower corner up to meet the opposite side
Then repeat with the other corner. I apologize for the photo, I was interrupted and started over, changing the sequence (you should have seen right over left here) but this is so simple, it shouldn't be confusing to follow. 
Fold one upper triangle down and you are done!

If you make this from a 8" square, you have a size that will hold a gift card.