Showing posts with label Spellbinders. Show all posts

Tuesday, April 5, 2022

SCT Crop & Create Cardmaking March 2022

The online card-making event on March 25-27 from Scrapbook & Cards Today was absolutely wonderful. Of the online events I've been part of, theirs has offered the most per event and been the most organized, even when unexpected things occurred behind the scenes. 

The first day featured what would have been "Make & Take" projects in a live event. This first card features a stamp, die, and stencil from Photoplay.


This card is a stitched Hi die from Spellbinders.  I made a second card without the stitching to use a few days after the weekend. 


These are from a company that I didn't know about, and is right here in Michigan, LDRS.


This is from American Crafts.

These are from Honey Bee


There were a few more that I either haven't finished yet. All of these kits and instructors were bonuses in that they weren't announced when we registered for classes. I knew there would be some, but the quantity and quality of product and instruction were great. 

The first scheduled class was Gina Krupsky and Gina K Designs in a class called Floral Frenzy. 


Next was Amy Yingling with products from The Stamp Market. I changed the second card to be a gift tag because I thought it was too bulky to mail. There was one more card that I chose to skip. This class was called Say It With Color. 


The third session was Libby Hickson, stamps from Hero Arts, class called Fun Folds.


The last class on Saturday was Birthday Celebration taught by Jenn Shurkus using Lawn Fawn supplies.


Sunday morning began with Cathy Zielske and Concord & 9th. The second image shows what is inside the card above it. There is a third card that I missed photographing. The class was Clean & Simple Stencils & More!


Next is Tayor Vanbruggen with a 4-piece stencil set, Create in Quads, from Taylored Expressions. Inking each layer with one color per stencil onto an 8" x 10.5" piece of cardstock gave us these four card fronts when cut apart. I haven't decided on sentiments for the first three cards yet. 


The seventh class, Spring Is In The Air,  was taught by Laura Bassen for Pinkfresh Studios. 


Last, but certainly not least was Make & Shake by Mari, by Mari Clarke for Honey Bee Stamps. She also taught the other Honey Bee projects on Friday. 


Wednesday, March 9, 2022

Welcome Baby Girl

I've fallen behind again in recording what I've been working on. This card uses a Spellbinders die to create the card which folds flat for mailing. The small die cuts added as embellishments are from the same set, Baby Step Block Card S6-134. The print papers are odd pieces from my stash. This went to a sweet little girl in South Carolina that I haven't met yet. 


Sunday, February 13, 2022

Valentine Candy Totes and Cards

Once again, The Paper Pixie (Video instructions here) for a win with these easy to make, no special tools required totes that will hold 4 Nuggets or Treasures candies. This first one was my test and came out so well, I gave it and a card to the woman who cuts my hair. 

A view from above. This reminds me of the cartons that hold 4 glass bottles of root beer 
or 6 bottles of long necks, my preferred way to drink real beer. 
These additional totes are for family members. The hearts were cut from a Gina K die
 that had a hole in the upper left where I placed the pearls and gems. 
The print papers are from miscellaneous sources in my stash. 

I made identical cards for my sons using a Tim Holtz Circuit Multi-Level Embossing Folder 665372 

My granddaughter's card used an image from My Favorite Things stamp set Unicorns and Glitter BB-100 on a background made using Altenew Stencil set Shattered Cubes. The popped out base instructions can be found at Jennifer McGuire's easy box pop 
My grandson is almost 12 so he is outgrowing some of the cutesy stuff but understands my love of puns and just plain corny stuff. I downloaded an image of a ruler to print on kraft-colored cardstock. The You Rule is a die from Spellbinders Pack It Up die set. 

Wednesday, September 23, 2020

Spellbinders Halloween and a Santa card too

Spellbinders makes great detailed dies.  This first card used a die set named Eek-a-Boo. It also included the ghost that I haven't used yet. My grandkids aren't going out as a devil and skeleton, but I had them in mind when I made their hair a reddish hue and blue eyes.  The jack o'lantern treat buckets and bats were included in the die set. The fence is a die from My Favorite Things. 


This card uses two die sets from Spellbinders. The car is cut from Sunday Drive, the license plate, trunk trim, skeleton and witch are all from Sunday Drive Halloween. The spiderweb was cut from a Stamps of Life die. The backgrounds on both this card and the next were done with Distress Oxides, sprinkled with water for some of the dots and also a mist of shimmer spray from Avery Elle. I didn't like that the spider web looked like it should be attached to something on the right so I drew a tree in. In four subsequent cards, I cut the spiderweb and used parts of it on each card. 
This card uses the same Sunday Drive for the car, the Santa, deer, license plate and trunk garland are all from the Sunday Drive with Santa set. I've made 17 of these cards, personalizing them for neighbors.


Tuesday, January 7, 2020

2019 Christmas Cards

I made 26 of these Santa with various finishes as cards. Each Santa had 57 separate pieces, not including the candy canes or gifts. This is a Tim Holtz Colorize die. Tim has announced this month that newer Colorize designs will have fewer pieces. Whew!


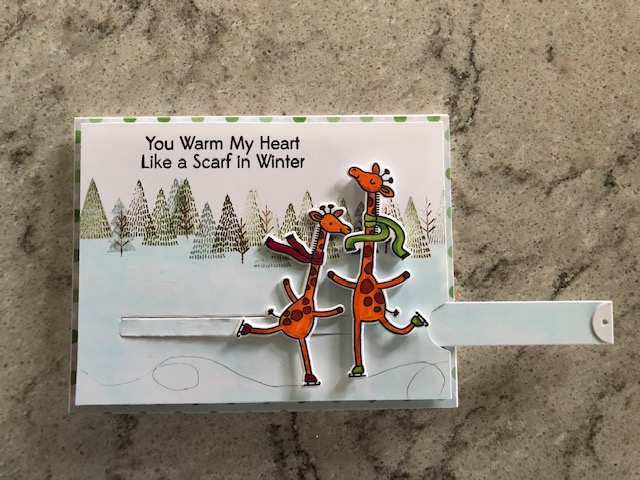
This card was for my giraffe loving niece, made with My Favorite things stamps and dies called Giraffes on Ice.  


This card used Honey Bee's House Builder Base and their Gingerbread Add On dies. 
These are called Impossible Poppers. They don't break open nor do they have a top that is removable. Instructions are here, at the Paper Pixie's website. I filled these with a variety of Hershey kisses. 
 

My great-nephews and great-niece get cash at Christmas. Here was this year's money holder design.
The gingerbread is on a belly band, holding the card closed.
Slip that off and here is the sentiment from Inky Antics Holiday Dough & S'mores
The gingerbread man was made using a Stampin' Up punch
Inside is the cash pocket
And one more message
The next five are from Christmas Selfies by MyFavorite Things


 Spellbinder dies named Poinsettia Pieces

 Two more Tim Holtz dies, Hanging Ornaments and Santa's Helper

And Ho Ho Deer Circle by Simon Says Stamp, the Merry Christmas greeting is a Tim Holtz die cut

I enjoyed making all of these cards but learned an expensive lesson. I knew the Santa cards were going to cost more to mail because they were square. I bought card blanks with matching envelopes labeled as being 6" square. That would have cost me 85 cents per card but the envelopes were actually 6 3/16" square which boosted the cost up to one dollar per card. I mailed 15 of them from inside a post office. A postal clerk applied the stamps and placed them in a mail bin. My receipt stated that they should arrive in two days. It took over 2 weeks for seven of them to begin reaching their destinations, the final eight never did. 

Other than that bad experience, the holidays were good and the cards were fun to make.