Showing posts with label Paper Crafts. Show all posts

Saturday, June 26, 2021

C9 Summer Camp

Concord & 9th, a stamp and die company, just held their first large online class event. They called it C9 Summer Camp. Six well-known paper crafters served as camp counselors to registered members. The camp counselors were Kristna Werner and Lydia Fiedler teaching watercolor techniques; Laura Bassen and Cathy Zileske teaching Turnabout (a Concord & 9th patented stamp method); and Caly Person and Becky Roberts teaching 3-D papercrafts. Greg Cottrell of Concord & 9th acted as the camp counselor and host. All of the cardstock, stamps, dies, inks, and watercolors used in the items that follow were included in the kits sent to registered campers.

Watercolor classes were taught Friday evening. These two cards used the same stamp and colors, but the techniques were quite different. This class was Kristinia Werner's. I haven't added a sentiment to the first card yet as I am undecided. 

Lydia Fiedler showed us how to make gray paint from the shades of yellow, blue, and red used in the florals above. Amazing! The gray clouds and lake scene isn't finished because I haven't decided whether to add the intended canoe (a separate painted die cut) or so something else. Creating the clouds by daubing the still-wet paint with paper toweling was a great thing to learn. So was using a wet into wet technique to creat rust on the VW van. 

This morning's classes featured Turnabout stamps. Check this website here for Turnabout stamps, what is available and how they are used. Laura Bassen taught these cards. The second one isn't a Turnabout, but if you know Laura, you know she loves rainbow color arrays. 

Following Laura was Cathy Zielski who used the same stamp and dies in both cards but achieved a different feel. 
After a lunch break for me (there were campers from all over the world so it wasn't the same meal break for everyone), we had arts and crafts, beginning with Caly person and these cards that had the same card base but featured different settings. I haven't added sentiments here yet either. These do fold flat to fit into an envelope for mailing, but for the time being, they are decorating shelves in my house.
Last, but certainly not least, was this floral wreath, taught by Becky Roberts who is known for making 3D flowers. The wooden wreath frame is 6.5" in diameter. 
I thoroughly enjoyed each class and each of the instructors, both professionally and in the "campfire" moments when they shared a bit about themselves. 

Once upon a time, I enjoyed traveling to classes held a good way from my home, even far enough away that I flew to classes and spent nights in a hotel. Those days are over for a variety of reasons that are my choices. Being able to take classes from home these past two days was absolutely great! I would love to have met these women in person but I know how meeting them actually goes when you are face to face. It isn't just you and them, it is you and anywhere from 49-199 other people with the same goal of talking to them! 

I will definitely do this again if Concord & 9th offers another event, and am already looking at two other events that feature other instructors whose videos and blogs I've been following. 


Sunday, August 9, 2020

Graduation greetings

The graduation card is from Graduation Set by Art Impressions, colored with Prismacolor pencils.
The gift box held graduation cash and Smarties candy because the grad is such a smartie. The green paper is from Stampin Up. The specialty paper was purchased locally. Directions for creating this box can be found Here at The Paper Pixie.

Friday, September 13, 2019

More changeable, seasonal decorations

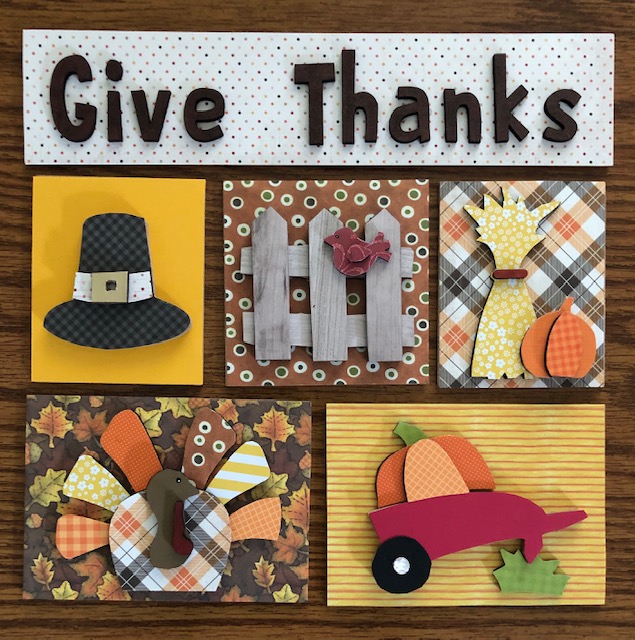
My last post was about wooden letters that spelled HOME with interchangeable images for the letter O.  While searching for them, I found a square shadowbox frame with a metal backing. It is divided to hold 5 images and a heading across the top. Many themes are available or you can use blank pieces to create your own. Here is a link to the products at Foundations Decor. There may be other sources but I haven't searched for them.

The first set I completed was Soccer, done with my grandson (the Prince of Sweetness) in mind. In the past few days, I have finished Halloween and Giving Thanks. They are done so I can now return to other projects on my to-do list. With the exception of paint or Sharpie marker on some small areas, each part is covered with paper from my scrapbooking and card making stash.


The last set isn't shown in the frame only because I mistakenly deleted that photo and saved this one which doesn't have the magnets attached to the backs yet. Each image has at least two layers to it and looks very nice in person. 

Wednesday, September 11, 2019

The "Home" Project

I bought the word HOME, sold as unfinished wooden letters and painted them black to go on a shelf in my living room. I ordered alternate "O"s from two different sources to cover most holidays. The O substitutes are each done with paper scraps. Occasionally, a bit of shimmer pen was added, the ladybug's eyes are dimensional embellishments and the beachball has a thick coat of gloss to make it look shiny. 


I think I'm done, mainly because I'm running out of room to store the alternate O pieces! I've had fun and considering the news is never fun these days, projects like this are soothing. 

Wednesday, November 14, 2018

Gingers, Huggers and Snowflakes

Sounds like it could be a political commentary, doesn't it? It isn't. I'm in my happy place, making things, not ripping people apart over politics.

First off, allow me to introduce you to Hip Ginger, a stamp and die set from Simon Says Stamp
I fussy cut mine while sitting with friends who were also working on Christmas paper crafts. I stamped the gingerbread men and their accessories on colored cardstock and assembled them onto cardstock that will become gift tags. I added a bit of colored pen or pencil embellishment to a few and used a black gelly roll pen on the eyeglass frames. I decided they needed eyes rather blank circles, so I I colored irises with a black Copic multiliner and added white glints to their eyes with a gelly roll pen. A twisted red and white cord was added to complete these tags.  
Here is a close up of one of the gingerbread men. 

Next up is Woodland Critter Huggers, a die set from Lawn Fawn. I also used Winter Add-ons for the Critter Huggers, also by Lawn Fawn. The basic set gives you the animal body parts, the add-ons provided the hat, scarf, mittens and small items that the animals could hold. The die set illustration shows the raccoon, fox and deer. The pig and cow were ideas I used from Jess Crafts.
The dozen below are going to be a gift to a friend who I hope will like them for her family members. The critter arms can hold a small piece of wrapped candy, such as a Hershey Nugget, a York pattie, etc or a candy cane. They can also hold a gift card. 

Last but not least, here are my snowflakes. They are made from three layering dies from Birch Press Design. This set is called Glitz Snowflake Layer Set
I've only made them in these color combinations so far but plan to do more. I was asked if they were difficult to line up. Not at all. The secret is to begin with a good quality cardstock that has some body to it.  Less expensive, thin cardstock doesn't release well from the die. I used glue on these, lining up the center opening and then one series of three small circles on one arm of the snowflake. That lined everything else up well. I haven't decided on a card for them yet, but I think it will be a plain card with a simple greeting inside. One snowflake will fill up the front of a standard card and mail easily. I will attach a hanging chord, securing it to the inside of the card. Recipients can add these to packages or perhaps hang them in a window or on a tree. 

Wednesday, April 11, 2018

Explosion and Waterfall Box, combined!

My alternate titles for this post were Boxes and Bitchin' or Crabby Creations. Neither would draw you in, would they?

It is the second week in April. I thought that I was going to get through the winter without a cold this year. Technically, I did as it is officially spring. I'm just annoyed that it hit me despite my precautions, tired from interrupted sleep and the normal blah feeling that comes with a cold.

Without further whining, I'll present this box that is both an explosion and multiple card box. Credit to the creator (Maymay) and directions are here at Maymay Made It!  The box begins with a sheet of 12x12 cardstock. I don't have much of that size in solid colors, and most of what I do have is textured and when creased, a white inner core often shows. I had recently won a box of paper supplies in a raffle and used the sheet of 12x12 green paper to make the box base. I didn't think about needing the same cardstock to make the lid. Maybe my cold was taking hold earlier than I thought? I had a lot of the orangish-yellow cardstock (8.5x11 size) so I used that for the waterfall mechanisms on the four interior panels of the box and for the lid. 

The printed papers are from Stampin' Up. They came from a coordinated pack of prints, each 12x12 in size. This box was given to a friend who recently vacationed in Hawaii. My prints weren't beachy, but the leaves and flowers reminded me of my trip to Hawaii. 
 
With the lid off, the center of the box is an accordion pleated explosion of black cardstock that could hold 18 photos, embellishments or written comments.
  
Each of the side panels is a waterfall. Gently pulling on the tab causes the panels to cascade, revealing 4 areas of printed surfaces in decreasing sizes. The plain undersides of these panels could also be decorated.


I will definitely make this box again. Maymay has a video in addition to a blog post with the dimensions spelled out for you. 


Friday, January 5, 2018

Christmas gift card and cash presentations

I don't like to stick cash or check inside a card without some sort of holder.

One of my sons called one evening to ask what I was doing. I told him I was drafting a box. After he made sure he heard correctly, he didn't question what I had said because this didn't surprise him. I like challenges.
Sometimes.
If you are giving someone a single piece of currency (or 2-3) or a single check, you don't need much wiggle room in designing a presentation container. In this case, I had some cash and a multiple page letter to enclose.

I measured the length and height of the largest piece. To simply matters here, let's say it was just under 6" long and 2" high, meaning a sheet of paper 6"x2" would cover the image with a bit of ease on all sides. Again to make this easy, let's say the depth of the stack of items was just und 1/2". One-half inch of paper would cover the depth of the stacked items with a little wiggle room.

Here is the box that I drafted. There is a front and back panel to the cash holder plus a flap (cover) that will come over the front. The depth of the box is 1/2", therefore 1/2" is added to each side of the 6" we measured above and also 1/2" between the front, back and cover. The overall dimensions of the paper used for this are 7" x 7". It was scored on one side at 1/2" and 6.5". In the other direction, it was scored at 2", 2.5", 4.5", and 5". 
The cover doesn't need sides so I cut those off represented by the xxxx. The bottom of the box, the next 1/2" section should show a second set of red cut lines. This will allow you to form neat corners when gluing the sides of your box together. I used double sided tape to make mine. The cover does not have to be 2" tall if you don't want the flap to come all the way down to the bottom of the closed box.

I made a belly band to keep the box closed. The die cut images on the belly band (measure around the closed box and allow a slight overlap for gluing together) are from Simon Says Stamp's Picture Book series of dies. I'm sorry the picture is of better quality. It was the only one I took before delivering these gifts. I used a corner rounder on the flap which is barely visible on the right hand side.

My nieces' children got these self-closing boxes with cash and candy in them. There are many versions of directions for these boxes described online. I used these directions from Dawn Griffith. I only covered the larger triangle with designer paper. The gingerbread men are from a Stampin' Up punch called Cookie Cutter Builder #140396.

Making these boxes was rather addictive. I made them in other sizes and will definitely make them again for other occasions. There is something fascinating about them closing so well without anything needed to seal them or hold them together.

Next is the last thing I plan to show that relates to Christmas of 2017 and it is a strange card for Christmas and therefore requires an explanation.

One son was giving a gift card to someone who had been a very good friend this past year. Could I make a card for him? Sure! I asked if the recipient had any special interests, such as, did one item, animal or place always make people think of this woman? He laughed when he realized the first thing people thought of with her in mind is the poop emoji. She is a lovely woman and not someone you associate with a pile of poop, but the image makes her laugh.

With that in mind, I created a top fold pile of poop card, then fitted a Santa hat to go over it. After doing that, I realized that the card wasn't wide enough to conceal the gift card. I wanted the poop card to fit easily inside an A2 envelope. What goes better with a pile of poop than a roll of toilet paper? Voila, the gift card holder was created to accompany the poop card.


Monday, December 19, 2016

Money holder Xmas cards

I don't know that this is technically a card as it does not open except for the flap of the present that the snowman is holding. That is where the folded currency will go.
I am a fan of paper punches. This was achieved with punches, one circle template and some cutting and scoring. The snowman's body is a 3.5" circle. You could trace around anything that gives you a look you like, ideally something wider than the present he is holding. Snowmen aren't meant to be skinny. 
I used a 2.5" circle punch for his head and hat. One circle cut in half will makes two hats. I was undecided if his hat would be striped or green. The first one became a combination of both.
I used Stampin' Up's Owl Builder punch, the ones shown above the owl, to punch out the snowman's eyes. These could be drawn on or cut freehand. The nose was cut free hand. The pompom on the top of the hat was cut from the designer paper half circle, then had the green part of the hat glued on top.


I used Scor-tape on the glittered paper as I've had better luck with that adhering than using a tape runner. Whatever you find works best for you is what you should use.
The snowman's feet are small ovals, another Stampin' Up punch. The 1" circle punch cut his hands which hold the present.
Here is the back view of the snowman. I attached his head to the back of the present rather than the top edge of his body. There was more surface to support his noggin this way. The ribbon scarf isn't truly tied around his neck. I cut a length, folded it and glued the crease to hold the streaming ends as shown, then added a bit of score tape (the white rectangle on the red ribbon). I turned that over and adhered the scarf to the back of the present in what would be the neck area.
The other two snowmen used a different patterned paper. The gold glitter-paper flower-like trim on the top of the hat is almost lost in this picture.
The present (cash or gift card holder) is a 7.75" x 3.5" strip of paper. Score at .5" and 3" with the short side at the top of your scoring board, then rotate and score at 3" and 6.5".  Crease all of your folds. The narrow 1/2" sides will be cut away from both sides of the flap. On the first two snowmen with the penguin print gift holders, I trimmed only the flap. On the paper shown above, the 1/2" was trimmed all the way down to the 3" score line, making the gift holder a little less bulky. The image on the right below is before trimming, I should have placed them in reverse order. I used a 1.25" circle punch to take a bite out of the 3" side of the holder. This will make it easier to grab the cash or gift card. 
I used narrow score tape on the tabs that are seen in the above right image, forming a pocket. I used two strips of wider tape to adhere this to the belly of the snowman, then attached the head as shown a few steps back. 

The only thing left to do is add some repositionable tape to the flap of the present. This will hold the gift closed without ruining the whole snowman when the recipient opens it. 

The white highlights on the eyes were done with a white Signo Uniball pen. Explaining this and adding the photos took longer than making them!