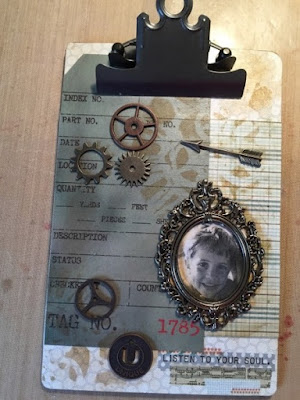
It isn't quite done yet, but I'm so jazzed by it, I'm writing this while contemplating if those roses are going to be used or not.
The project began with this clipboard, the metal quote tag (I stopped adding white distress crayon to show you the tag as it came from the package) and a photo frame, all Tim Holtz products.
After removing the hardware, I used Faber Castell gel medium to adhere the paper to the clipboard and then added a coat of the gel medium to the top surface. Here is that step finished.
Still using Tim Holtz Distress Crayons, I mixed Vintage Photo with Peacock Feathers and daubed it over this stencil, one large image on the upper right and a smaller one on the lower left.
The metal quote tag was one of six in a package and was the most appropriate for my intended recipient. Distress crayons are extremely soft. The first pass filled most of the letter recesses but a second pass and wiping away the excess was the best look. As you can see in the first photo, the color used was Picket Fence.
Now it was time to play with embellishment placement.
I added some twine to one end of the quote tag but still needed more dimension. In the Mad Scientist class we used paper flowers on one project. I liked that idea but not only would an ivory rose be too stark against this, I wondered if a flower would suit this since it is going to my son. Flowers aren't only for women, but something about a white rose just wasn't working for me. Time to get out my elaborate spray booth....a big box.
These are were spayed with various inks in dull gold, teal and a pearl mist. That wasn't pleasing me so I attempted to use Shimmer Mist but the spray's nozzle is clogged. I poured some in a cup, dipped the roses in the liquid and then sprinkled glow in the dark glitter on them. Go figure...a simple ivory rose is too girly for my taste but one with glow in the dark glitter pleases me!
Not a great picture, but proof that the glitter does glow in the dark!
As I contemplate how to finish this, I'm trying roses in various locations and thinking that the twine on the clip either needs to go or needs to be beefed up with more twine. My husband is going to check his junk drawer for discarded keys tomorrow and other small bits of metal that might be an interesting addition. Even the simple addition of one more gear, elevated on the trio to the right, made me happier.I'm close, but not quite done, and liking where this is going. The little guy in the photo is my younger son. I predict his reaction will be "Awww.....Mom" with a big grin.
Following Day Update.....
The roses are going to be used elsewhere although they might be a decoration on the presentation tonight or tomorrow.
I added a key, a copper washer, a few more Tim Holtz gear-type embellishments and a 1980 penny. It took my husband and I at least twenty minutes of going through drawers, containers of loose change and a penny jar to find one.
My fingers may never be free of ink stains or gel medium again!


No comments:
Post a Comment