The Art Impressions Elephant Slider stamp and die set seems to be intended for a birthday because of the hat and the candle on the top cupcake. I used this set to make this Valentine card. There will probably be a name added to the blank white which is the slider, but that is not important for now, this post is about creating the card.
I stamped the elephant and stack of cupcakes from the set (4802 is the product number from Art Impressions) on Xpress-it paper and colored the images with Copic markers, some Prismacolor pencil and a clear gelly roll pen. I masked off the candle that was on the top cupcake and turned the square base of the candle into another cake sprinkle.
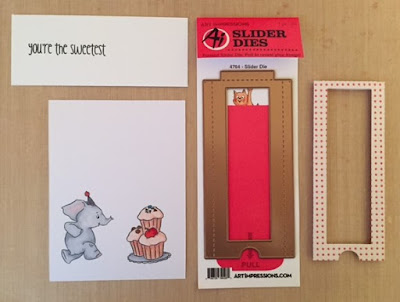
You could make your own sleeve for the slider but I used the die intended for this, product #4764. Shown below is the stamped wording that will behind the elephant (part of the stamp and die set), the metal slider die and the paper I used for that to the right.
Here are the dies for the elephant and cupcakes. The elephant die is in place, the other die shows where the candle was intended to be.
This is how they came out of the Sizzix. I trimmed away the remaining white border and the candle
The Copic colors I used on the elephant were C2 and C4 for the body, R20 on the inner ear and nails with a light coat of C2 over it. The tray is also C2 and C4. The cupcake papers are RV11, RV23 and YR000 with some Prismacolor pencil Sienna #945 to take the down pinkness and create a different color from the icing. The icing Copic colors ar R00 and R02. The cherry is R27 and R46 with the same Prismacolor pencil on the stem. The chocolate chips are E37 and E47. The sprinkles are R27, B05 and a green that I forget to make note of. The hat is B05 and R27. A clear gelly roll pen was used on the elephant's eye, hat, on the tray, the sprinkles and the cherry.
I cut two strips of white paper. The first is the width and length of the paper cut from the slider die. The die provides scoring lines, shown here folded over, and with double-sided tape applied. I neglected to take a photo of the slider's frame in place over the paper with the sentiment.
There is a reason why the sentiment above is not centered. I knew that when the elephant is slid all the way the right (he is running over to the stack of cupcakes), some part of the sentiment might be hidden by his body if the words were centered in within this space.
The second strip of white paper is the actual sliding piece. It is cut a little narrower than the width of the frame. I later trimmed the right end. At the point in this photo, I wasn't sure how I was going to finish that side.
I used a narrow piece of double-sided tape to hold the cupcakes to the far right side of the frame.
Here the cupcakes are in place. The double-sided tape holds very well.
The elephant is attached to the sliding strip of paper, NOT the frame. I used foam tape to add just a bit of dimension so that the elephant would move freely through the window of the frame and not catch on anything.
After trimming the excess from the right-hand side of the panel, I punched out a 3/4" circle from the dotted paper and a 1/2" circle from the solid red, glued the red on top of the dotted paper, and glued that onto the far red edge of the sliding paper. I used wider double-sided tape on the back of the whole mechanism to adhere it to the red card base.
I have used the slider die over upright figures (Stackables by Art Impressions) but this is the first horizontal slide I've made. Other possibilities are in my head, both with Art Impression images, those of other stamps I own and even of personal photos with humorous or scenic images behind the slider.


