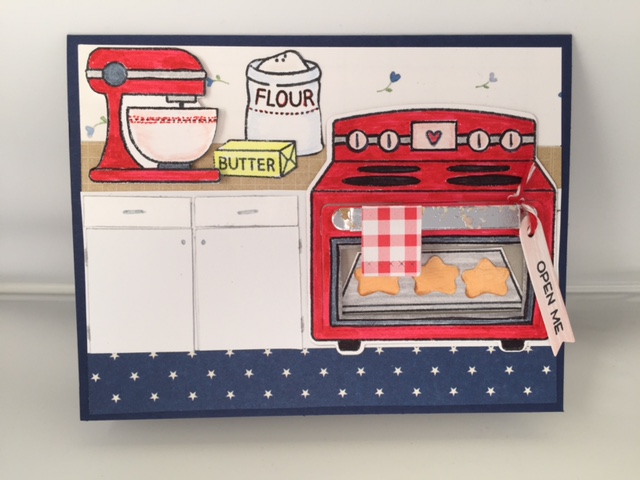
Someone very special has a birthday coming up. I don't have a stamp that says exactly how I feel, and all of that love and happiness would never fit on one small card anyway. What to do? Pull out my file of Lawn Fawn stamps and dies! I love their entire line of products.
I used images from both Baked With Love (LF805) and Sprinkled With Joy (LF1214) and stamped these images while thinking about what to include on the card. That is a cookie sheet on the left side, upper row and a decorator bag of icing on the right in the next row.
I colored these images with a combination of Zig Clean Color markers and Prismacolor pencils. The paper is from a pack of white cardstock from Michaels or Joanns.
I don't claim to have truly original ideas (someone already invented the wheel and sliced bread) and I tend to either be so focused on detail or having so much fun while working, I don't stop to take photos at various stages. Coloring these images was just simple coloring. I used a tiny print paper to make wallpaper in the background, a beige paper to represent a counter top, white cardstock for the cabinet facing with additional white cardstock cut for the doors and drawers (initially drawn on but that looked too flat) and a strip of dotted navy paper for the flooring.
The handle of the oven is 3-dimensional. The towel is a die cut that is folded over the handle and attached with a glue dot. The mixer is on a dimensional to move it forward on the counter. The cookie sheet, star-shaped cookies and bag of flour were cut from dies from the set that coordinates with Sprinkled With Joy, die set LF1215. The butter and mixer were cut free hand. Some of the other images in the first photo weren't used as I ran out of room. Cute, right?
But wait....there is more....the reason for the "Open Me" tag is that the door opens! An additional die set LF1271, provides the oven door that opens, the 3-D oven handle and the towel that hangs on the door handle.
On the inside of the card, I stamped a chef image and Happy Birthday from a set called Bon Appetite. That is no longer available as the company, There She Goes, no longer exists. "You Make Life Sweet" is from Impression Obsession MC181
One more shot from an odd angle in an attempt to show the mixer and oven door handle as being dimensional.
I saved the unused images, knowing that I will make this card again. If my real oven were so much fun to play with, we might have home cookin' around here!
Who am I kidding...cooking cuts into craft time!
Wednesday, November 9, 2016
Sunday, November 6, 2016
A mini book attempt
Recently I made a house out of paper that wasn't strong enough to handle scoring without splitting. In this case, the paper was a heavier gauge and became rather bulky when folded and glued.
The idea is still a good one and while this wasn't finished to the point of using it as greeting, practicing with images from Stampin' Up were fun and this might just become something for my granddaughter to look at and play with. Here is the cover of this mini book that, with covers, could hold 8 images.
I began with a sheet of 11 x 8.5 inch card stock, trimmed to 11" x 7.5" I'm not sure why the directions I used (and now cannot locate online) called for the paper to be trimmed by one inch. The measurements I will give here match what is photographed.
The trimmed paper, with the shorter side at the top of the score board, was scored at 3.75 inches. Rotate the paper to landscape view and score at 2.75", 5.5", and at 8.25"
If you have worked with Scor-tape, you know it is very sticky and holds immediately. The directions I used said to remove the backing on all of the tape and then fold and assemble the book. This is where my disaster struck. You are NOT folding and adhering the entire upper half of the paper in the above photo to the lower half, you are ONLY adhering the end panels.
Confused? Remember that the paper is slit along the horizontal score over the two middle panels. That slit allows you to pull the middle fold on the lower half into a valley fold while pushing the upper half into a mountain as you adhere the end panels into this configuration. The reason you did not apply tape to the third panels from the left on top and bottom is that the second panels that are taped are going to adhere to them in a moment.
After my initial disaster of having the Scor-tape attach to paper before properly aligned, I removed the backing only on the innermost crease (think of it as the binding side of a book) as I folded those pages into place. I then used a paper piercer to ease the tape off of the other lengths of Scor-tape to finish assembly.
The print papers used are from the HoHoHo Collection by The Stamps of Life (a 6x6 pad). The oval dies used are from DieNamics (Double Stitched Ovals Stax) and the images are from Stampin' Up.
Santa is from the Cookie Cutter stamp set and Cookie Cutter Builder punch was used to cut him out.
The bear is from Fa La La La Friends, the fox from Cozy Critters. The bear was die cut using Bear Hugs, the fox was cut free hand.
Reindeer is from Cookie Cutter (cut with same named punch), Llama is from Fa La La La Friends, cut with Fiesta Time die.
The owl is from Cozy Critters, cut with Owl Builder punch and the gingerbread man is from Cookie Cutter stamp and punch.
The back of the card has layered ovals, ready for a stamped greeting and signature.
The idea is still a good one and while this wasn't finished to the point of using it as greeting, practicing with images from Stampin' Up were fun and this might just become something for my granddaughter to look at and play with. Here is the cover of this mini book that, with covers, could hold 8 images.
I began with a sheet of 11 x 8.5 inch card stock, trimmed to 11" x 7.5" I'm not sure why the directions I used (and now cannot locate online) called for the paper to be trimmed by one inch. The measurements I will give here match what is photographed.
The trimmed paper, with the shorter side at the top of the score board, was scored at 3.75 inches. Rotate the paper to landscape view and score at 2.75", 5.5", and at 8.25"
The middle section of the paper needs to be cut as shown. I used my Stampin' Up paper cutter, inserting the blade at the 2.75" mark on the long score line and cutting down to the 8.25" mark. To be clear, I made that cut before using a bone folder to emphasize the scoring shown in the right side photo above.
How you choose to adhere your pages is up to you. My first attempt followed the directions I had read, but without good results. From previous experience, I did not want to use liquid glue or a small tape runner. Sometimes glue warps paper and while I love the convenience of a Tombow style tape runner, it doesn't always hold well. I used Scor-tape, in this case, Sookwang. Turn the paper to landscape orientation and apply tape runner or Scor-tape inside the scored rectangles shown.If you have worked with Scor-tape, you know it is very sticky and holds immediately. The directions I used said to remove the backing on all of the tape and then fold and assemble the book. This is where my disaster struck. You are NOT folding and adhering the entire upper half of the paper in the above photo to the lower half, you are ONLY adhering the end panels.
Confused? Remember that the paper is slit along the horizontal score over the two middle panels. That slit allows you to pull the middle fold on the lower half into a valley fold while pushing the upper half into a mountain as you adhere the end panels into this configuration. The reason you did not apply tape to the third panels from the left on top and bottom is that the second panels that are taped are going to adhere to them in a moment.
After my initial disaster of having the Scor-tape attach to paper before properly aligned, I removed the backing only on the innermost crease (think of it as the binding side of a book) as I folded those pages into place. I then used a paper piercer to ease the tape off of the other lengths of Scor-tape to finish assembly.
Wow, what a lousy photo....but it shows what you have before folding the pages into a traditional book format.
The size of your decorative paper or photo for each page is a matter of choice. I decided to use 3.5" x 2.5"The print papers used are from the HoHoHo Collection by The Stamps of Life (a 6x6 pad). The oval dies used are from DieNamics (Double Stitched Ovals Stax) and the images are from Stampin' Up.
Santa is from the Cookie Cutter stamp set and Cookie Cutter Builder punch was used to cut him out.
The bear is from Fa La La La Friends, the fox from Cozy Critters. The bear was die cut using Bear Hugs, the fox was cut free hand.
Reindeer is from Cookie Cutter (cut with same named punch), Llama is from Fa La La La Friends, cut with Fiesta Time die.
The owl is from Cozy Critters, cut with Owl Builder punch and the gingerbread man is from Cookie Cutter stamp and punch.
Zombies!
Yes, it is past Halloween but still before the election....and that is scarier than Halloween!
I had fun with Zombie stamps and phrases from Art Gone Wild! The specific stamps are named Vegas Zombies (L-2801); Punk Zombies (L-2779); Zombies Beach (L-2661); Zombie Wisdom (SC-2800); and Zombie Truths (SC-2799). While not to everyone's taste, I thought these would be funny for my one son to take to work to share with his department. His work is serious but management tries to infuse fun in many ways, including themed events and dressing up for Halloween.
I filled 24 short plastic test tubes with mini M&Ms and added the Zombies. Most were cut to better fit the tubes. All were colored in pencil, some with a bit of Wink of Stella or a Gelly Roll glaze added.
I had fun with Zombie stamps and phrases from Art Gone Wild! The specific stamps are named Vegas Zombies (L-2801); Punk Zombies (L-2779); Zombies Beach (L-2661); Zombie Wisdom (SC-2800); and Zombie Truths (SC-2799). While not to everyone's taste, I thought these would be funny for my one son to take to work to share with his department. His work is serious but management tries to infuse fun in many ways, including themed events and dressing up for Halloween.
I filled 24 short plastic test tubes with mini M&Ms and added the Zombies. Most were cut to better fit the tubes. All were colored in pencil, some with a bit of Wink of Stella or a Gelly Roll glaze added.
Monday, October 24, 2016
Hershey Nugget boxes
I wanted to express thanks to a group of people, a simple acknowledgment of their cheery attitude and efficient manner. These boxes were made to accompany my thank you greeting. I made two dozen of them so that everyone would have a small token of my appreciation.
There are many directions available online for presentations of Hershey Nuggets (or Nestles Treasures) but most of the boxes weren't a size that pleased me. Some designed to hold three candies were rather wide and long for three but certainly not large enough for four. I tweaked various directions to come up with dimensions that worked for me.
First off, here is a plate of my boxes. Each one slides open (the top is a sleeve) to reveal three candies.
Each box began as a 5 1/4" by 3 3/4" rectangle. With the paper in landscape orientation on my scoring device, lines were scored at 1/2"; 1 1/8"; 4 1/8"; and 4 3/4". Turning the paper to portrait orientation, I scored it 1/2"; 1 1/8"; 2 5/8"; and 3 1/4". Still in this position, each of the vertical lines were cut from the outer edge to the second horizontal line, top and bottom respectively. Here is the top cut, bottom untouched.
Next you will remove excess paper from the corners of the boxes. The walls will be folded inward onto themselves, making the box sturdier. I am a visual person, so looking at this is explanation enough for me. To explain in words what I've done, I removed the smaller corner squares first, then one small square on either side of that along both edges.
It doesn't photograph well, but I on the bottom of the box (mountain rather than valley fold lines) I put adhesive on the four small flaps that would fold inward to begin box shaping.
On the inside of the box, adhesive was added to the four rectangular areas.
I know it looks like I've skipped photographing a step, but in reality, I just didn't have another pair of hands to hold the box while taking a photo. In the beginning, I glued the small flaps to the inside (the short ends of the box), then added a swipe of adhesive and folded the outer end inside to finish the short ends, then repeated with the long sides.
After making a few this way, I got a rhythm going and applied all the adhesive (both inner and outer sides) and assembled the box quickly and easily.
The rest of the box is a sleeve, and is very simple to make. Begin with 5" x 3" rectangle. With the long side across the top (landscape orientation), score at 5/8"; 2 1/4"; 2 7/8"; and 4 1/2". Those two end flaps are not quite the same dimension. The first one is 5/8" wide, the other end is 1/2". If that bothers you, you could cut the rectangles at 5 1/8" and both flaps would be the same size. My measurement allowed me to put the adhesive on the outer (print) side of the 1/2" flap and have the wider side cover it. By that, I mean that the 3" edge of the first flap (5/8") covers the smaller flap and meets at the crease. Sometimes, if both sides are cut supposedly the same size but are a bit off or are creased a little catty-wampus, you have a problem.
I had a lot of fun making and decorating these boxes and will undoubtedly make them again.
There are many directions available online for presentations of Hershey Nuggets (or Nestles Treasures) but most of the boxes weren't a size that pleased me. Some designed to hold three candies were rather wide and long for three but certainly not large enough for four. I tweaked various directions to come up with dimensions that worked for me.
First off, here is a plate of my boxes. Each one slides open (the top is a sleeve) to reveal three candies.
Here are the boxes, uncovered, with candies inside:
Each box began as a 5 1/4" by 3 3/4" rectangle. With the paper in landscape orientation on my scoring device, lines were scored at 1/2"; 1 1/8"; 4 1/8"; and 4 3/4". Turning the paper to portrait orientation, I scored it 1/2"; 1 1/8"; 2 5/8"; and 3 1/4". Still in this position, each of the vertical lines were cut from the outer edge to the second horizontal line, top and bottom respectively. Here is the top cut, bottom untouched.
Next you will remove excess paper from the corners of the boxes. The walls will be folded inward onto themselves, making the box sturdier. I am a visual person, so looking at this is explanation enough for me. To explain in words what I've done, I removed the smaller corner squares first, then one small square on either side of that along both edges.
Here is the box with all of the corners cut away:
My next step is something I learned to do a while ago that makes assembling corners much easier. What I've done here is trim the sharp corner on each of the tabs. This photo shows the left side done, the right untouched.
Here is the box completely trimmed on black paper.
Creasing each fold line, this is now beginning to look like a box.It doesn't photograph well, but I on the bottom of the box (mountain rather than valley fold lines) I put adhesive on the four small flaps that would fold inward to begin box shaping.
On the inside of the box, adhesive was added to the four rectangular areas.
I know it looks like I've skipped photographing a step, but in reality, I just didn't have another pair of hands to hold the box while taking a photo. In the beginning, I glued the small flaps to the inside (the short ends of the box), then added a swipe of adhesive and folded the outer end inside to finish the short ends, then repeated with the long sides.
After making a few this way, I got a rhythm going and applied all the adhesive (both inner and outer sides) and assembled the box quickly and easily.
The rest of the box is a sleeve, and is very simple to make. Begin with 5" x 3" rectangle. With the long side across the top (landscape orientation), score at 5/8"; 2 1/4"; 2 7/8"; and 4 1/2". Those two end flaps are not quite the same dimension. The first one is 5/8" wide, the other end is 1/2". If that bothers you, you could cut the rectangles at 5 1/8" and both flaps would be the same size. My measurement allowed me to put the adhesive on the outer (print) side of the 1/2" flap and have the wider side cover it. By that, I mean that the 3" edge of the first flap (5/8") covers the smaller flap and meets at the crease. Sometimes, if both sides are cut supposedly the same size but are a bit off or are creased a little catty-wampus, you have a problem.
I had a lot of fun making and decorating these boxes and will undoubtedly make them again.
Quality supplies or bargain bin purchases?
It isn't always obvious and easy to choose between similar looking products that vary in price. Sometimes the intended project merits a greater investment, other times you'll want to get away as inexpensively as possible. As a knitter, I know the difference between a quality yarn and something that is unbelievably inexpensive. I'm not naming brands nor am I shaming anyone in their choices. I mention this just as something to think about. There are good yarns that are not terribly expensive. They handle beautifully, they feel good in your hands while knitting, and they wash and wear well.
The same is true with fabric. A mill may make a similar fabric that is sold in the large, chain craft stores as what they sell in quilt shops, but the threads themselves, along with the dyes and thread count will be different which will affect the same issues: handling, the feel of the finished garment and how well it washes and wears. Experience, if not trusted advice, will show you when to invest in the costlier supplies. I once made a beautiful dress that looked good until it was washed. My bargain fabric did not hold up at all and the dress was never worn again.
My most current lesson on value concerns paper. I had a Stampin' Up die (Home Sweet Home) to use to make a cute little house which was going to hold candy. I wanted the house to be gray but I did not have any Stampin' Up gray paper, nor any other brand of similar quality. I'm not speaking of truly thick paper, just something with decent body. I did have gray paper in a multi-pack of grays and blacks from Joanns and thought that would be okay.
Isn't this cute? The black door has a stamped ghost but out vellum greeting visitors. There is a spiderweb, also vellum, on the front and back. The light in the windows is a shiny gold paper behind the black window panes that were die cut.
Here are the sides and back of the house:
I left glue off of one side of the roof so that it would open for candy.
So what is the problem with this gray paper? If you look at the above images closely, you might already see it. The paper is so thin, the scored lines which were made when running it through the die cutter (a Sizzix Big Shot), are splitting open.
Live and learn. And don't forget to add gray paper to my Stampin' Up shopping list!
Monday, October 10, 2016
An anniversary card
Someone very special had an anniversary this past weekend. This is the card I made for them.
First, the uncolored image in a sample placement. The stamped image is from Birds and Bells, by Honey Pops for Inky Antics
The honeycomb paper was cut larger than the stamped image included in this set to form a bell.
The paper used in the background was an odd bit I've had forever. Inside, the strip of this paper on the left was actually a pocket that could hold cash, a check or a gift card.
I colored the bell and ribbons with various markers and then added Glossy Accents and Wink of Stella which unfortunately don't show in the photograph.
First, the uncolored image in a sample placement. The stamped image is from Birds and Bells, by Honey Pops for Inky Antics
The honeycomb paper was cut larger than the stamped image included in this set to form a bell.
The paper used in the background was an odd bit I've had forever. Inside, the strip of this paper on the left was actually a pocket that could hold cash, a check or a gift card.
I colored the bell and ribbons with various markers and then added Glossy Accents and Wink of Stella which unfortunately don't show in the photograph.
My summer top...finished for fall
Back in May, armed with the Spring 2016 issue of Creative Knitting, I bought Cleo yarn by Plymouth to make the Mandarin Tango Tee. I didn't plan to make it exactly as shown color-wise but the color selection where I shopped led to choosing orange yarn. I was going to have it finished by the end of June to wear to an outdoor wedding celebration with a fiesta theme.
When I complained about the decapitated photo, he caught me smirking. I give up!
For a variety of reasons, I didn't get it done in time for the party, then other events and projects got in the way of completing this even though I really liked it and enjoy working with this yarn. Finally, it has been finished and was worn this weekend over a white turtleneck instead of over a white tank top.
I asked my husband to take a photo and focus on the top. He cut my head off.When I complained about the decapitated photo, he caught me smirking. I give up!
A selfie close up. This is unblocked but I think it looked okay as is. I will wear it a few times this fall and look forward to wearing next summer as originally planned over tank tops.
Subscribe to:
Posts (Atom)