Monday, December 12, 2016

Cards, Christmas and Creating

Those who know me personally may wonder what the heck is going on here with the big gaps in posting. Things are hectic, but okay and then of course, the holiday season interferes with posting both because of time and because of keeping things secret for a few more weeks.

I've pared back on many things that I used to do but have increased the number of handmade cards. This has been fun for me although it is getting to crunch time, getting the last few made and in the mail.

In no particular order and with photos only to serve as inspiration (along with stamp names for reference), here is what I've made so far this season.

Same card, just background color and designer paper changes. The card was cut with Sizzix Step Ups 660718 a Stephanie Barnard card template, and Santa die set from Stamps of Life. The words at the bottom of the card are a die from the same company (Stephanie Barnard's Stamps of Life).


These did cost extra to mail. If I hadn't elevated the mustache, pompom and hat brim, I think the card would have mailed with regular postage.

I missed taking photos of the next series of completed cards. All were  painted with watercolor on cold press paper. Some of the finished cards had this oval attached to a green card base, slightly elevated, and others were behind a second layer of green card stock with an oval cut into it. That paper was elevated (pop dots) and had the effect of looking through an oval window. This resulted in extra postage too. The third photo shows what a mistake adding fun flock was. The stamp is Robins on a Branch by Wild Rose Studio.


Paper Pumpkin is a monthly kit subscription from Stampin' Up. The following card was made from their November kit and went to some of my neighbors. The inside greeting (stamp) was also part of the kit. 

This card used a simple tree-shaped die over various papers and few silver stars.
These next two cards (the third photo is the inside greeting for the second card) used String of Lights die from Lawn Fawn. I used Dr Ph Martin's Hydrus watercolors on the first card, then added Crystal Accents to make the bulbs appear shiny. While it is a good look, the paper buckled a bit from the Crystal Accents. The base of the bulbs were die cut using a mottled foil-like paper.
The bulbs here are the smaller dies from the same set. I used Brusho pigments on watercolor paper to create various areas of colors, then die cut from that sheet. The halos around the lights were done with Tim Holtz Distress Ink pads, applied with a dauber before the bulbs were glued in place. The sentiments are from Winter Scripty Sayings by Lawn Fawn. I thought the front of the card needed something else, and these branches satisfied me. I used a paper punch to make a template, then mixed Distress Ink colors together to daub onto the template to get subtle variations. 

My knitting buddies are getting cards made with Ugly Sweater and Sweater Words and Appliques stamp sets from Simon Says Stamp. 


A few cards weren't Christmas themed. I placed a Thanksgiving card in my niece's bathroom, thanking her for hosting that holiday. The dies here are from Stamps of Life, Pilgrim Boy 2 Stamp and Pilgrim Girl 2 Stamp. They both have red hair because my grandkids have red hair.
My grandson had a spectacular progress report at school which led to me making this card. The card base is Triple Circle Flip Its 659237 by Sizzix, also available through Stamps of Life, the words within circles are Words for Circles by Stamps of Life, and the super hero is from Super Day by Darcie's Heart and Home. The stamp doesn't include glasses but since my grandson wears them, I drew these on.

My nieces and nephew have grown up with my sense of humor and groan at my puns. The first card isn't quite pun-y but is "spirited. It was made using Holiday Spirits by Avery Elle. Sorry about the inside shot being skewed. The paper isn't buckled, that was me holding it awkwardly. 

The girls are each getting this card, made with Stampin' Up's Fa-la-la-la-la Friends

The mother of these wonderful people, my dear sister-in-law loves llamas. This card is from the same set, Fa-la-la-la-la Friends. The inside greeting is just a simple Merry Christmas. 
This last group of cards were made with specific friends in mind. Each card represents an interest in their life.  One friend is a great photographer and I've about worn out the camera angle in greeting cards for her. I attempted one more camera theme which my husband looked at and said, "that's nice, dear, but I don't know what I'm looking at". Scrap that one! I went with the Instagram logo instead with Santa in a Poloroid frame inside. The punch that I used to make the template for the greenery on the card with bulbs gave me the greens used her to make this otherwise non-Christmasy card look a bit seasonal. 

One friend likes cows. I used Dairy Chrismas from Art Impressions to make this card.
The flamingo fan is getting this card. The stamp is Flamingo Set by Art Impressions.  The string of lights and words are my own.
Another friend is very involved in her church and I thought this angel and the word Peace inside (unknown makers, I've had them forever) were appropriate for her. 
 

And finally, these are for my dog loving friends. That isn't to say they are the only dog lovers, but something about these stamps called out to me with these ladies in mind. The first two dogs are images stamped from Friends for Cookie by Stamps of Life. Backgrounds and hats are my own. 

One friend had three Corgis until recently, now just two claim her heart and lap. I made these using various circle, scalloped circle, heart and cookie cutter punches from Stampin' Up. 
One of my friends begins working on Christmas crafts in January. I'm never that organized but I do plan to start earlier next year. I have another dozen cards to go yet. I would do better sticking to one design but I have so many stamps, dies and papers....I just can't stop! These aren't the only ones I've made this season. Some got mailed before I remembered to photograph them. 

Wednesday, November 9, 2016

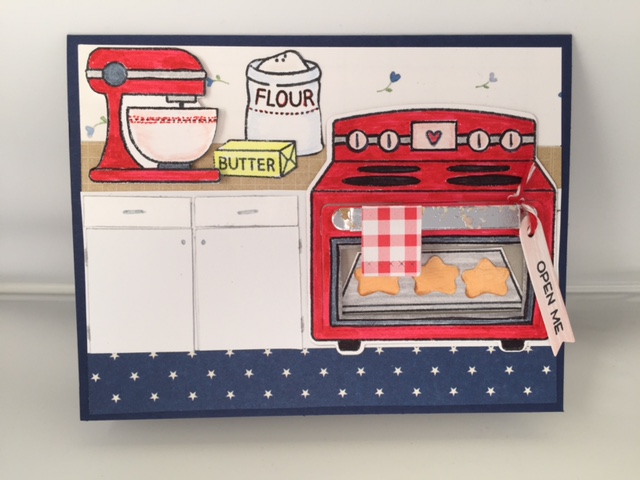
Kitchen-y cheer in a birthday card

Someone very special has a birthday coming up. I don't have a stamp that says exactly how I feel, and all of that love and happiness would never fit on one small card anyway. What to do? Pull out my file of Lawn Fawn stamps and dies! I love their entire line of products.

I used images from both Baked With Love (LF805) and Sprinkled With Joy (LF1214) and stamped these images while thinking about what to include on the card. That is a cookie sheet on the left side, upper row and a decorator bag of icing on the right in the next row.
I colored these images with a combination of Zig Clean Color markers and Prismacolor pencils. The paper is from a pack of white cardstock from Michaels or Joanns.

I don't claim to have truly original ideas (someone already invented the wheel and sliced bread) and I tend to either be so focused on detail or having so much fun while working, I don't stop to take photos at various stages. Coloring these images was just simple coloring.  I used a tiny print paper to make wallpaper in the background, a beige paper to represent a counter top, white cardstock for the cabinet facing with additional white cardstock cut for the doors and drawers (initially drawn on but that looked too flat) and a strip of dotted navy paper for the flooring.
The handle of the oven is 3-dimensional. The towel is a die cut that is folded over the handle and attached with a glue dot. The mixer is on a dimensional to move it forward on the counter. The cookie sheet, star-shaped cookies and bag of flour were cut from dies from the set that coordinates with Sprinkled With Joy, die set LF1215. The butter and mixer were cut free hand. Some of the other images in the first photo weren't used as I ran out of room. Cute, right?

But wait....there is more....the reason for the "Open Me" tag is that the door opens! An additional die set LF1271, provides the oven door that opens, the 3-D oven handle and the towel that hangs on the door handle.
On the inside of the card, I stamped a chef image and Happy Birthday from a set called Bon Appetite. That is no longer available as the company, There She Goes,  no longer exists. "You Make Life Sweet" is from Impression Obsession MC181
One more shot from an odd angle in an attempt to show the mixer and oven door handle as being dimensional.
I saved the unused images, knowing that I will make this card again. If my real oven were so much fun to play with, we might have home cookin' around here!

Who am I kidding...cooking cuts into craft time!

Sunday, November 6, 2016

A mini book attempt

Recently I made a house out of paper that wasn't strong enough to handle scoring without splitting. In this case, the paper was a heavier gauge and became rather bulky when folded and glued.

The idea is still a good one and while this wasn't finished to the point of using it as greeting, practicing with images from Stampin' Up were fun and this might just become something for my granddaughter to look at and play with. Here is the cover of this mini book that, with covers, could hold 8 images.
I began with a sheet of 11 x 8.5 inch card stock, trimmed to 11" x 7.5"  I'm not sure why the directions I used (and now cannot locate online) called for the paper to be trimmed by one inch. The measurements I will give here match what is photographed.

The trimmed paper, with the shorter side at the top of the score board, was scored at 3.75 inches. Rotate the paper to landscape view and score at 2.75",  5.5", and at 8.25"
 
The middle section of the paper needs to be cut as shown. I used my Stampin' Up paper cutter, inserting the blade at the 2.75" mark on the long score line and cutting down to the 8.25" mark. To be clear, I made that cut before using a bone folder to emphasize the scoring shown in the right side photo above.  
How you choose to adhere your pages is up to you. My first attempt followed the directions I had read, but without good results. From previous experience, I did not want to use liquid glue or a small tape runner. Sometimes glue warps paper and while I love the convenience of a Tombow style tape runner, it doesn't always hold well. I used Scor-tape, in this case, Sookwang. Turn the paper to landscape orientation and apply tape runner or Scor-tape inside the scored rectangles shown.
If you have worked with Scor-tape, you know it is very sticky and holds immediately. The directions I used said to remove the backing on all of the tape and then fold and assemble the book. This is where my disaster struck. You are NOT folding and adhering the entire upper half of the paper in the above photo to the lower half, you are ONLY adhering the end panels.

Confused? Remember that the paper is slit along the horizontal score over the two middle panels. That slit allows you to pull the middle fold on the lower half into a valley fold while pushing the upper half into a mountain as you adhere the end panels into this configuration. The reason you did not apply tape to the third panels from the left on top and bottom is that the second panels that are taped are going to adhere to them in a moment.
 
After my initial disaster of having the Scor-tape attach to paper before properly aligned, I removed the backing only on the innermost crease (think of it as the binding side of a book) as I folded those pages into place. I then used a paper piercer to ease the tape off of the other lengths of Scor-tape to finish assembly.
Wow, what a lousy photo....but it shows what you have before folding the pages into a traditional book format. 
 The size of your decorative paper or photo for each page is a matter of choice. I decided to use 3.5" x 2.5"
 
The print papers used are from the HoHoHo Collection by The Stamps of Life (a 6x6 pad). The oval dies used are from DieNamics (Double Stitched Ovals Stax) and the images are from Stampin' Up.
 Santa is from the Cookie Cutter stamp set and Cookie Cutter Builder punch was used to cut him out.
The bear is from Fa La La La Friends, the fox from Cozy Critters. The bear was die cut using Bear Hugs, the fox was cut free hand.
Reindeer is from Cookie Cutter (cut with same named punch), Llama is from Fa La La La Friends, cut with Fiesta Time die.
The owl is from Cozy Critters, cut with Owl Builder punch and the gingerbread man is from Cookie Cutter stamp and punch.
The back of the card has layered ovals, ready for a stamped greeting and signature.