Thursday, February 25, 2016

Basketball slider card

My older son just finished a season of coaching boys basketball and will celebrating his birthday soon. I have been thinking about a basketball themed card for a while and this is what I created.
I began with these stickers which I've had for quite a while in my stash. I adhered one ball and one hoop to white cardstock and cut them out. The base of this card began with an 8.5" x 11" black cardstock cut to 8.5" x 5.5", then scored to make a 4.25" x 5.5" card.
I cut a second piece of black at 4.25" x 5.5" (which was further trimmed later) and tested layout of the hoop and where the ball would arc. I marked placement of the hoop and drew an arc with a pencil.
I refined the arc a bit by tracing around a curve and freehanded a second, somewhat parallel line to make a channel for the slider. I cut this with an Xacto knife.
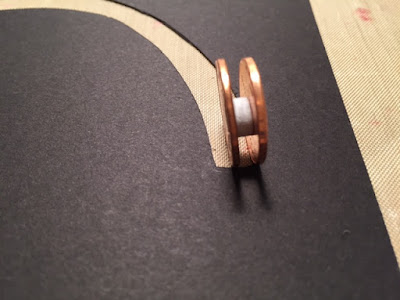
The basketball rides on two pennies with a pop dot holding the pennies together. I have a variety of sizes, brands and thicknesses of these. The term "pop dot" is used generically here, not as a particular brand. The channel needs to be slightly wider than the dot for ease of movement.
The penny assembly easily slides into the channel. The basketball on cardstock is attached with a glue dot.
I trimmed this piece to 5" by 3.75" and cut a piece of white cardstock the same size. Behind it is printed paper cut at 5.25" x 4". I held the black piece over the white and penciled Happy Birthday! in the arc.
In this photo, the white paper is glued to the basketball design paper and the letters have been traced with a black pen. I erased the pencil marks after this.
Unfortunately, I didn't photograph the back of this top piece before assembly. I used pop dots that were a bit thicker than the one used with the pennies and basketball. I placed them near the corners, mid-points between the corners and one near the center but a bit closer to the arc. 
If I could set my phone's camera to video and hold it in my teeth, I could show you how freely the basketball travels that channel.
If my dentist reads this, I was just kidding. I never use my teeth as tools. 
On the inside of the card I used more of the basketball print under a white area for my greeting, matted onto a black rectangle. I curved the corners of the white and printed papers. Yellow post-it notes are hiding the sentiment for privacy. If it isn't clear what is in opposite corners, those are stickers of whistles that coaches use.
This went together much more easily than I expected and I really like it. It was my first slider card but won't be my last!


Saturday, February 20, 2016

Art Impressions Spinner Card

Another week, another birthday....

This past week was my husband's birthday. I bought the Art Impressions spinner stamp set titled Love Spinner with this event in mind.

I love the characters AI creates. I love the idea of this card. I am not thrilled with how it came together but I expect that will improve with practice. I don't tend to practice with cards, I jump in and expect a workable result right away.

Here are the two images, colored with Copic markers and a bit of multi-liner accents. Fussy cutting them is a bit of a nuisance but I thought I would touch up white edges after adhering them together with the spinner thread sandwiched in the middle.
Perhaps a finer cord (embroidery floss? Perle cotton?) would have been a better choice. This silver cord (a Stampin' Up product) had a curl to it as it came off the spool. I taped it down to my work surface and used a bit of Scotch tape to adhere one image to the cord. I used a tape runner on the back side of the second image and then tired to line them up. Ugh! It wasn't perfect by a long shot and I had bits of white showing, bits of tape runner exposed on edges and some misalignments had to be trimmed more that I liked.
The stamp set suggested an opening 3.5" wide for the area of this spinner. I must not have centered it as I had to cut a wider opening. I cut a matching frame of cardstock for the inside of the card so that the raw ends of the silver cord would be covered.
What will I do differently next time?  Work on placement (centering) of the spinning image along with a different method of adhering the images is foremost. I think I will try areas of Scor Tape, removing the backing a piece at a time. I'll definitely be checking out what over cardmakers have done. I also think I'd like the card base to be a tri-fold so that there would be a solid background behind the spinning couple when the card stands up.

Saturday, February 13, 2016

Small treat box

I try to always give credit to whatever source I used for each of my projects but occasionally I take notes rather than pin something on Pinterest or bookmarking a link. That was the case with this box. I don't know where I found the directions but in looking for it this afternoon, I see that there are many similar directions around. I'm sharing the dimensions that I used with apologies to whoever deserves the credit.

I made quite a few of these. Each box holds a foil wrapped Ghiradelli chocolate square.  
Here are the step by instructions.

Begin with sheet of paper 8.5" x 5". Score at 2", 4", 6" and 8", then rotate the paper to portrait orientation and score at 2" and 3".
 
Using Stampin' Up's Scalloped Tag Topper, you will punch the square closest to the 1/2" column, skip a square and punch once again.
The punch is not a perfect fit for the rectangle. You will have to eyeball it and center it. If you look closely, especially at the right of this photo, you will see one of the scored lines.
Once you've punched both panels, it will look like this.
This close up shows that you'll have some raggedy bits on the panels next to the punched out parts.
Cut down each score line from the long edges toward the 2" and 3" score lines. To clean up the ragged parts, use scissors to cut from each ragged hip to the score line. You could also just trim it straight from the top clean edge to the fold line. The rectangles you are cleaning up become the parts of the box that fold over your treats, under the scalloped tabs.  
On the 1/2" end, cut away the narrow rectangles leaving just a tab in the middle section.
I used Scor-Tape on the tab to hold the box together.
NOTE: Before assembling this box, I should have scored the scalloped tabs, explained below.


To form the bottom of the box, fold in one side, add adhesive to an adjacent panel, adhere that and repeat. 
 
Here we are at my Oops! part of the instruction.....I should have scored the scalloped tabs before this was formed into a box. It isn't impossible to score them as you see here, it is just easier when it is still flat. Score each tab at 1" 
Now that you are at this point, you are ready to add trim as the box construction is finished.
Cut a strip of design paper at 17/8 inch, then cut that strip into four pieces at 7/8" and two at 3/4".
The 3/4" pieces go on the top, the 7/8" pieces on the sides. If your design has a distinct direction to the pattern, you may want to pay attention to orientation when cutting your strip and again when placing the pieces on the box.

Use a ribbon to hold the tabs together and add further embellishments as desired. 

Friday, February 12, 2016

Abe Lincoln, the guitar man

Ahhhh.......back from a truly wonderful vacation, a Disney cruise with our family. I haven't asked permission of my adult kids to share their photos and hubby never wants his shared, but here I am with my favorite Pirate and then with both him and his sister as my beach buddies.
   
Now that we are back home, birthday mania begins. Immediate and extended family birthdays keep us going into mid-April before a break of a few weeks and the little Princess has her first bash. 

The oldest of three great-nephews turned 11 this week. Hubby and I began taking the easy way out on gifts, giving the kids cash but never just cash in an envelope. Examples of past gifts are herehereherehere and last but not least, on my earlier blog here

This gift is Abe Lincoln, guitar man. I did not take pictures during the process because my hands were too busy. Here is Abe.
He is made from 5 bills, one each for head, shirt, pants, arms and guitar. Let me stress that crisp new currency would have been much better for this but it was cold out and I worked with what I had. 

I found this link to making Abe's head in a hat this morning which seems easier (or at least more clear) than what I used yesterday. A bit of fudging occurred in the backside of my creation's head but I don't think the birthday boy will mind. 

Directions for the shirt are here: Shirt directions.  The original shirt that I tried to make had a necktie but with worn currency, it just wasn't working for me. Those directions are here.
Shirt with Necktie, all one bill
The pants and arms were made by folding each bill in half lengthwise.
The pants were opened, then the long ends folded to the middle.
 
Fold this strip to make a point to define the legs. This will be covered by shirt and/or guitar.  Sorry that these photos are sideways. I've tried to fix the orientation but something is agreeing with Blogger/
 
The arms began with the same fold as the legs but after the third photo above, they were folded again to make a narrower strip. I placed this behind the completed shirt to figure out where to bend for elbows to hold the guitar.

I followed this link to make the guitar, pausing it more than once, but it actually wasn't difficult. 

I used removable tape to adhere Abe to the blue paper. The worn currency not holding sharp folds and the bulkiness of it all meant that removable tape wasn't holding well, even after weighing this down with a lot of metal paper punches. In the end, I use small rolls of regular tape and decided to put Abe in a page protector which lead to using a new (for me) tool.  
For a description of what this does, click here.  This was my first time using this tool which was a recent gift. It worked well but my first insertion of glitter......yikes! I wasn't thinking about static in that page protector and made a mess. I finally ditched that first effort, make a seam in a new one, using a static eraser on a plain sheet of paper to make a funnel and poured some glitter into the bottom area under Abe. Once that was sealed, Abe was inserted and left open at the top for spendability.