Friday, February 12, 2016

Abe Lincoln, the guitar man

Ahhhh.......back from a truly wonderful vacation, a Disney cruise with our family. I haven't asked permission of my adult kids to share their photos and hubby never wants his shared, but here I am with my favorite Pirate and then with both him and his sister as my beach buddies.
   
Now that we are back home, birthday mania begins. Immediate and extended family birthdays keep us going into mid-April before a break of a few weeks and the little Princess has her first bash. 

The oldest of three great-nephews turned 11 this week. Hubby and I began taking the easy way out on gifts, giving the kids cash but never just cash in an envelope. Examples of past gifts are here, here, here, here and last but not least, on my earlier blog here. 

This gift is Abe Lincoln, guitar man. I did not take pictures during the process because my hands were too busy. Here is Abe.
He is made from 5 bills, one each for head, shirt, pants, arms and guitar. Let me stress that crisp new currency would have been much better for this but it was cold out and I worked with what I had. 

I found this link to making Abe's head in a hat this morning which seems easier (or at least more clear) than what I used yesterday. A bit of fudging occurred in the backside of my creation's head but I don't think the birthday boy will mind. 

Directions for the shirt are here: Shirt directions.  The original shirt that I tried to make had a necktie but with worn currency, it just wasn't working for me. Those directions are here.
Shirt with Necktie, all one bill
The pants and arms were made by folding each bill in half lengthwise.
The pants were opened, then the long ends folded to the middle.
 
Fold this strip to make a point to define the legs. This will be covered by shirt and/or guitar.  Sorry that these photos are sideways. I've tried to fix the orientation but something is agreeing with Blogger/
 
The arms began with the same fold as the legs but after the third photo above, they were folded again to make a narrower strip. I placed this behind the completed shirt to figure out where to bend for elbows to hold the guitar.

I followed this link to make the guitar, pausing it more than once, but it actually wasn't difficult. 

I used removable tape to adhere Abe to the blue paper. The worn currency not holding sharp folds and the bulkiness of it all meant that removable tape wasn't holding well, even after weighing this down with a lot of metal paper punches. In the end, I use small rolls of regular tape and decided to put Abe in a page protector which lead to using a new (for me) tool.  
For a description of what this does, click here.  This was my first time using this tool which was a recent gift. It worked well but my first insertion of glitter......yikes! I wasn't thinking about static in that page protector and made a mess. I finally ditched that first effort, make a seam in a new one, using a static eraser on a plain sheet of paper to make a funnel and poured some glitter into the bottom area under Abe. Once that was sealed, Abe was inserted and left open at the top for spendability. 


Sunday, January 24, 2016

More Scratch Off Valentines

A few days ago I wrote about Inky Antics Valentines on this blog entry.  Today I made more valentine cards, one from each of the other sets mentioned in that post.


The rectangular scratch off sticker used was the from the 1" x 2" pack.


The stickers on the last two cards were 1" x 1.5" rectangles. All were colored with Tombow Markers. The heart punch used is Border Hearts from Stampin' Up. 


Friday, January 22, 2016

Four Fold Card with Spinner

This card is based on instructions found here at Dawn's Stamping Thoughts  Her directions are clear. Scroll down on that page for her video tutorial.

The card uses 4 pieces of cardstock cut at 5.5 x 4.25 inches, the black paper seen here. The turquoise paper (again, 4 pieces) is cut at 5.25 x 4 inches. I used oval dies to cut the openings and to cut the oval frames from black glitter paper. The one thing I did differently from Dawn's directions was to apply glue to the cardstock rather than the back of the frame pieces. This was easier for me, perhaps because the glitter paper (scrap, unknown source) was very thin and flimsy.


Here is what I like and don't like about this first attempt:

I love the concept. It was an easy card to assemble and potentially very impressive. It will fit in a standard envelope for mailing. By not using a patterned paper in the turquoise areas, I can add embellishment or write greetings.

The only difficult part is lining up the frame over the opening. I suspect that if I had cut the frame out of cardstock, there may have been less trouble. The glittery paper I used is so thin, it was almost like working with knit fabric that moves around on you. Obviously paper doesn't stretch, but lining it up and holding it in place with wet glue gave me a less than perfect result. The last view and the closeup below are the first frames that I glued in place. See how the white backing of the frame on the opposite side of this opening shows?  I can't cut that. Not only would it be awkward to get in there and make a smooth cut, the frame's dimensions on the other side would be off. I will use a fine tip black marker on it to make it less noticeable.


The wording and image are both from Art Impressions, a set called Live Laugh Love. I used a combination of Tombow markers and Prismacolor pencils to color the ladies. Their earrings look dull here but were done with metallic ink pens.

Okay, hours later I am back with updated photos. The black marker solved my white paper problem. I didn't have an embellishment that pleased me so I used a Tim Holtz stencil and Copic multiliner pen to add some flourishes.


Here is an overhead shot of the card


I'm much happier now. This evening's photos show the true color of the card cardstock. 

Monday, January 18, 2016

Inky Antics Valentines

Inky Antics is one of my favorite design lines. My local scrapbooking store loves them too and often has new releases before most of us have seen them online. The bad news for me is that I lose all restraint when I fall for new releases. This is good news for the shop owner.

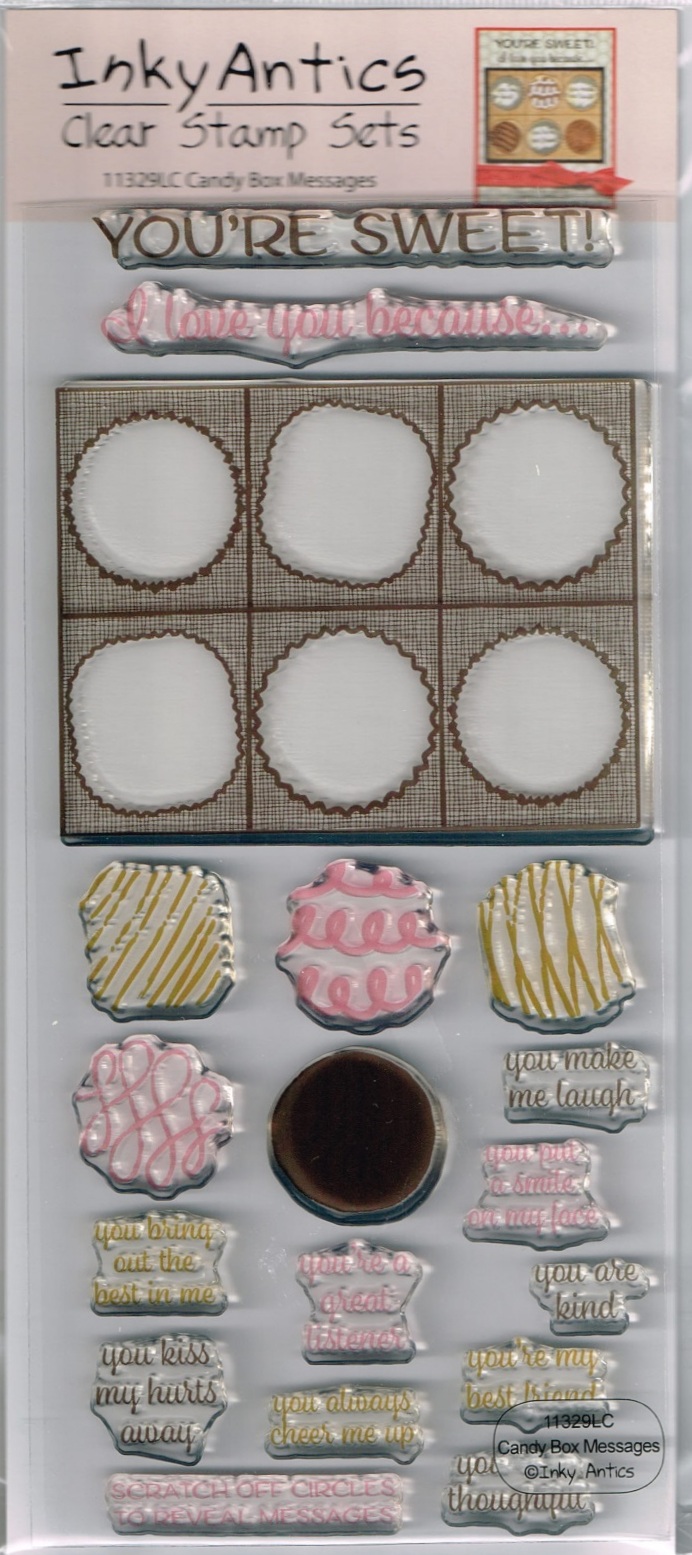
I came home with four sets of stamps all geared toward Valentines Day. Three sets are corny riddles. Oh my....right up my alley! The fourth makes candies as you would find in a box of chocolates (did you hear that in Forest Gump's voice?) with sweet sentiments. What makes all of this over-the-top fun is that Inky Antics also makes scratch off stickers to use with these sentiments and riddle answers!

Here are the stamp sets, Valentine Riddles #1, #2 and #3


Here is the Candy Box Message set and their circle scratch off stickers. They also make rectangular and squares ones to coordinate with the riddle answers above.


Here is a sample message stamped, then the sticker being scratched off and the end result. I have read directions on making your own scratch off solution but haven't done it. This is quick and easy but perhaps if I was going through dozens of them, I'd want to make my own solution. Then again...I probably would not. This is neat and some of the DIY ones I've seen are lumpy and irregular in shape.


I've only made one card so far, using the Candy Box Message set. Here are the steps I took to make it.  The red ruler is part of my Mysti stamp positioner. I avoided buying this tool for well over a year, thinking it was too expensive and unnecessary, but then I used one in a class and was sold. I was fortunate to buy one just before the product was revamped and is now being sold at an even higher price.


Test placement of sentiments on stamped image


Sentiments inked with brown ink and being applied. The grid lines you see are the top plate/cover of the Mysti.


I stamped candy swirls onto medium and dark brown papers and cut them out with a 1" circle punch. The circles were too perfect for the way I think of dipped chocolates so I trimmed the shapes before adhering them to the blank spaces.


Time to cover up the sentiments


Double matting the box of chocolates, adhering that to a card front and adding messages from the same stamp set created this card: 


Copic and Prismacolor Penguin

Isn't this girl (or maybe guy flaunting that hibiscus?) cute? I certainly relate to the sentiment, especially on a day where the outside temp has a below zero wind chill!

The penguin stamp is My Favorite Things, Penguins in Paradise. Coloring was accomplished with Copic Markers, Prismacolor Pencils, and a white Gelly Roll pen. This was done in a live class with Amy Shulke of Vanilla Arts, taught at Remember When Scrapbooking (Facebook Page) or check here Remember When Scrapbooking (web page).

Amy also teaches monthly classes through an online source, Patreon. See her web page for information on that. 


I've been using Copics for a while now. What did I learn in this lesson? What color(s) to use as a base below the darks and how to shade the whites of the penguin's body. While there would be nothing wrong with coloring the body simply black and white to make a cute card, you have to admit this is more interesting. I won't say realistic for those of you who question a penguin wearing a flower and an inner tube, but that is what the coloring really is, more realistic. Once you learn this, it barely takes any more time to color this way than straight application of one color. 

The colors and techniques in the oval behind the penguin make me so happy. Most of the coloring is Copic Markers but what a bit of Prismacolor pencil adds is amazing!

Another part of this particular class was balancing the number of colors used in a pleasing way. Some things we know instinctively when dressing ourselves or decorating a room but when we have an image to color....ack!!!...what do we do?

I am not a shill for Amy's classes or Shannon's store. I mention them because it is what I know and encourage nearby friends to investigate. I cannot share specific information on colors and techniques here because they aren't mine to share. To do so would shortchange the instructor and also myself as I paid for this class.

If you are inspired by this image but not interested in taking online classes, look for instructors near you or online who teach more than the basic Copic blends of three sequential colors. Adding a pencil or gelly roll after the Copic part is done can enhance what you've done. You can always color the monthly freebie at Vanilla Arts and watch Amy's speed coloring video of the image, seen here.

Whatever you do, Happy Coloring!

Thursday, January 14, 2016

Tuxedo Card

My younger son's birthday was yesterday. I found directions for a Tuxedo card on Pinterest. I am almost embarrassed to admit the problems I had wrapping my head around the directions but am admitting that here in case someone else falls into the same trap.

First, the card:


The inside panel is white, mounted on black and then onto the striped paper used in the belly band. I didn't photograph that before adding the handwritten sentiment which I am not sharing here. 

Now about the directions....

The directions are here and are based on directions given here in metric measures. I don't "think" in metric (even if it is easier) so I had windows open for both Diane Barne's (the first link) and Sarah-Jane Rae's directions. My confusion was a misinterpretation on my part. I read, re-read and read again where to make the first two score lines that form the gate like openings to this card. The closed card overlaps as a suit jacket would, but the score lines were the same measure on each end. I was completely ignoring the fact that the middle section was not twice the width of these flaps. I'm good at math....honest!....this was just a duh! moment that we all have from time to time. As soon as I cut and scored a scrap piece of paper, I realized my mistaken thought and pretty much flew through making this card.

The shirt buttons were done with a pliers style punch of indeterminate size that just looked right to me. The tuxedo buttons are the largest circles on Stampin' Up's Owl Builder Punch. I eyeballed trimming down the lapels and cut the notches by hand after figuring out where I wanted them. I used the snipped scrap as a pattern for the second side. The greeting on the belly band is from Stampin' Up's From the Herd set of stamps. I cut the belly band at 1.25" by 11, folded it around the closed card and adjusted (trimmed a bit of excess) before adhering one end over the other. The black paper is an inch tall and was eyeballed to center the greeting. The tie was done as described in the first link.

Now I need to come up with an equally impressive card for this son's older brother in March. The boys are getting to an age of being my younger brothers or possibly I'll just call them my husband's sons. Too bad they share some of my personality and physical resemblance.