Sunday, December 27, 2015

Year end review

To paraphrase John Lennon, another year older and what have I done?

Not so much new lessons learned as old ones reinforced although some new craft techniques were learned along the way. What were the reinforced lessons? Don't sweat the small stuff. Enjoy the journey. Get away from negative people as much as possible. Do what makes you happy.

Our Disney cruise last January was derailed because our daughter-in-law's pregnancy was too far along for Disney rules. Was that crushing? Nope. We're going in 2016 and used last year's airfare to go the Nickelodeon Resort in Orlando. A change in plans meant unexpected pleasure. Who knew I'd meet such *interesting* and *famous* men?


Here's some of that "small stuff" that is growing and blossoming before our eyes, our granddaughter:


And of course we have her big brother who has made 2015 a year of discovery and much laughter. Did you know you could grow a handlebar mustache before the tooth fairy made her first visit? Did you know that when the tooth fairy decides to visit, she sometimes comes multiple times in one month?


Okay, enough about small stuff. I could go on about those two sweethearts forever but I wasn't going to do that in this reincarnated blog. Let's discuss "enjoying the journey". 

In June of 2014 I rejoined Weight Watchers. I have lost 85 pounds so far, 37 of them disappearing in 2015.  I write about that journey here. The reasons why I was struggling with weight finally made became clear to me. It isn't that I learned a new method (trust me, I tired dozens of fads and gimmicks over the years) but that I finally understood myself. Better late than never!


Getting away from negative people was next. I go days without watching any televised news and scroll past some people on Facebook when they are in what I consider "rant" mode. I know that sometimes we all need to vent but that can be catching and pretty soon everyone in a group is up in arms. That gives me a headache. 

Lastly, doing what makes me happy. I have done more of that in the way of crafting than in many years before. I've always enjoyed my hobbies but sometimes felt I should be doing something else that seemed more practical or productive. 

Pfffftttt!

I am not going to solve the world's problems by sitting here worrying about them or feeling guilty. What I can do is be happier and maybe that will be catchy to someone on the fence about feeling crabby that day or trying a little harder to find some joy and humor in their day. 

The card that I make, the mittens I knit or any of the other things I create make me happy during the process. When I hear that someone was touched because they recognized I was thinking of them during both the process and the act of giving them something, little bursts of happy fireworks go off for me. 

A card making group that meets monthly made snowmen out of socks this month instead of paper crafting. The ones we made were larger than these but so easy and cute, I bought a package of baby socks and made these little ones for some of the members of the Monday morning Weight Watchers group. A few were struggling with issues beyond the scale. I don't know them well enough to have addresses or even know their last names, but I thought these snowmen might let them know I care. 


The expressions of most who received them was wonderful and the comments a week later by two nearly had me in tears. These little guys apparently helped at least two women get through a difficult week. 

We don't know the struggles strangers are facing. A smile doesn't cost us a thing and is good exercise. Maybe that is the only smile someone will see that day. Wouldn't it be nice to know your smile, holding the door open, or handing out a coupon you don't need brightens someone's day?

I might not have it in me to solve the worries of the world, but I will make my corner a little brighter bit by bit. Yarn, glitter, paper and off tune humming will be involved.

I end most of my weight loss blog posts with 'Onward and Downward' meaning I am still going strong and the scale numbers are going downward. I think my words for the coming year on this blog will be Sparkle On or something similar. Not all crafts need to sparkle but our happy hearts should.


Sunday, December 20, 2015

Cards, Christmas edition 2015

Yikes, over a month without a post. It must be the holidays....

The first card I made this season was this one. It folds flat for mailing when you omit the battery operated tea light inside. The window and sentiment are Stampin' Up dies and stamp as is the image done on vellum. I really liked this until it hit me that a flickering glow would be from a fireplace or candle inside the house, not out in the snow. Unless the house is on fire, this shouldn't be!


Sticking with the window die (Hearth & Home) and Stampin' Up's Brick Wall embossing folder, I made this next using images from Holiday Home. The tree above is from Happy Scenes, both SU products.


The sky has a watercolor wash, the snow has a bit of white sparkle on it by way of a glue pen and sprinkle of fine glitter. It needed some greenery and thankfully, a friend came through with a baggie of greens from a punch that I believe was from the Martha Stewart line and has been discontinued. That looked much better, and I was happiest when I added some red berries  (Stickles). I made 15 cards in this style. 


My knitting group members were recipients of this card made with Lawn Fawn's Baaah Humbug stamps. The black background was done with a white ink pad over Tim Holtz' Holiday Knit layering stencil. Since not much of it showed on the front but did look like a ski sweater design, I used a bit of that on the inside, writing my own greeting.


This card may not have happened, certainly not by the dozen, without the use of a Misti stamping tool.  See the Misti here   I avoided this purchase for a long time because of the price but haven't regretted once since that first use.

Another group of friends received this card which was fun to do, assembly line style. The instructions came from Connie Stewart's blog detailed here.  The stamped sentiment is from Laugh Out Loud Christmas by Clearly Besotted.


One neighbor with young children didn't need them confused by the above sentiment, so his house received this card. The stamp is Jolly Santa by Woodware Clear Magic Singles. Santa's face is marker and colored pencil, hat and background are markers, his beard is glue and white glitter and his eyeglasses have a coat of clear gelly roll pen on the lenses.


One more Stampin' Up die got a lot of use this year, the Delicate Ornaments die. I used it on glittery paper from a pad purchased at Target and on metallic papers from either Michaels or Joann's. Those were my favorite. The weight of the paper made them easy to work with.

Silver metallic over green glitter on left, Silver over white cardstock on right.

Silver metallic over green glitter on both. 

Left has yellow glitter and silver metallic over gold background, right has silver metallic and red metallic over gold. I have no idea how I should have photographed these. They look much better in person.

These ornaments were from a matte gold, textured paper. The branches were embossed with matte gold powder. 

It would have made more sense to pick one card and make all of them the same but choosing just one design is like picking your favorite child....impossible!

Friday, November 13, 2015

Gift card (or cash) purse card

Today's creation comes by way of Jackie Topa's blog (Addicted to Stamping) and video, seen here.

This is simple to make. Jackie's directions are great and I appreciate that she explains why she scored one area before cutting, and how cutting both the DSP (double sided or designer paper) and white card stocks a certain way provides usable pieces for tags and card backgrounds. I won't repeat her directions here, I can't improve on anything. I will just say that it all begins with a 6" x 8" piece of paper for the body of the purse, and a few pieces of 2" wide white paper for the purse flap and inside greeting area. A cutter and scoring board make this super easy, but this could be accomplished without specialized tools.


These two cards are going to friends as a thank you. One card will include cash as reimbursement for an item a friend ordered. Both friends will have their greetings printed on a Post-It note so that they can reuse these cards if they wish.

The paper seen here is from Stampin' Up. I think a purse body out of solid red with a white flap and perhaps some dimensional snow or frosty glitter would be cute as a Christmas gift card holder. Maybe a tiny ornament, snowflake, or paper holly under the brad that holds the flap in place? Oh wait...I've got it! A strip of black at the bottom of the white flap and a square belt buckle under the brad: Santa's belt!

Friday, November 6, 2015

November Art Journal

I might need to hum that song from Disney's "Frozen" as I don't seem to loosen up all that well on projects like this, but I do see improvement.


Part of the lesson dealt with transferring the quote from a laser printer's image (ink jet will not work) to the page. Practice will improve my technique but I liked that. 

The rectangle of blue/aqua and the colors on the leaves are Izink colors. I love them. The leaves weren't completely dry when I was ready to leave the class last night so I gently sandwiched them between two sheets of newsprint weight paper. Carrying that, two tote bags and my purse to the car proved to be an unwise move. A gust of wind came up and I was chasing these leaves around the parking lot among Mother Nature's leaves that were blowing around. 


Ever look at an item so often in stores that you can't remember if you own it or not? I thought I had a stamp of nondescript writing at home. That stamp and a grayish ink pad were going to be used in the border when I have grunge done with black Staz-on ink.  This isn't a matter of right vs wrong, it just isn't how the class sample was done. 


Wednesday, October 28, 2015

My inner voice is speaking

Throughout my life, people have told me that I should paint, knit, sew, etc for a living. I don't have the right mind set to be commissioned to make things and charge for them. The comments I've heard at craft shows while sitting with friends who were vendors made me want to scream. Someone who has sewn on a few buttons and bought 3 yards of lace for $1 from the bargain bin thinks a hand sewn, smocked baby dress made of Swiss batiste is overpriced at $50. That price doesn't cover materials and the hours put into it, even at minimum wage.


My creative hobbies are almost as important to me as breathing. I have never spent more than a few days away from creating something.  I learn while creating even if I occasionally want to scream and rip things apart, figuratively and literally. Sometimes an effort is "good enough" depending on the item's purpose, but if a person always stops at "good enough", you don't really grow and learn.

The woman who made the beautifully smocked infant's dress might not have made mistakes on that particular gown that needed to be undone and restitched, but she had many dozens of that style completed in her history of sewing and smocking, not to mentioned hundreds of hours of teaching both. She smiled at my frustration with the comments we overheard. She had learned to tune them out and listen to her own voice.

What does my voice tell me?

When I look at a finished item,  it is okay to appreciate it for what it is and how well it is done, perhaps the biggest accomplishment sometimes being that it is FINALLY done. A recent sweater threatened to be on needles forever...or so it seemed. But that voice inside? That voice said forget about "seems" and look at the arm seams. They aren't terrible but they could be better. Taking them out and restitching isn't the answer because the problem that I see was in the knit pattern itself, the way decreases were shaped, started and stopped. If that made no sense to you, just know that many things in life aren't obvious until after you've gone the distance. I'm not going to knit new sleeves, I will just know to do them differently next time.


I'm not being negative by seeing my mistakes, or if not actual mistakes, areas that could be improved. If I were a negative person, I wouldn't pick up the needles, brushes or scissors again. My inner voice reminds me that I am not in competition with anyone but myself. My goal is to try to be better today than yesterday, and that applies to everything in life.


Getting better one day at a time has led to Weight Watcher success (my weight loss journey is here), improvement through practice and repetition in my crafts, and in my outlook toward the world. If you aren't careful, the media and angry voices in social media and on the streets can make you think the world is coming to an ugly end. It isn't though, not any time soon because I have too many projects to finish and techniques to perfect!


Coloring on black

Recently, in a live class taught by Vanilla Arts instructor Amy, we colored this image with Prismacolor pencils.


The stars didn't originally have rhinestones and silver ink, I dropped something on this at home and my fix made things worse. Next time around coloring this, things will go better. Even with my oopses (in class and at home) this reaffirmed that I like coloring on black.

Another artist whose work I follow is Sandy Allnock. This post of hers led me to playing with Fine Tec Pearl Colors on Amy's image. This was my first time playing with these pigments. Shades of violet weren't in the kit I bought and I didn't attempt to mix shades before applying them to the paper. Sometimes I'm too stubborn for my own good. I wanted to play with this last night but something had irritated one eye to the point where it only felt okay if I kept it shut. That is my reason and excuse for not attempting to blend colors on a palette.

The Fine Tec paints look very similar in their tray which is not labelled. Here is a shot of the tray with the color names and samples below.  When 5 out of 12 colors so closely resemble each other dry, don't you think the tray should identify the colors?


They were fun to work with, but perhaps the technique used for the Prismacolor work (sky color radiating behind the moon) wasn't the best choice for this.


The pearl colors look like the moon is glowing like a fireball to me. Maybe its a meteor! 


Live and learn, and have fun coloring!

Diorama Anniversary Card

I goofed while making this and didn't keep my notes, but I do have the basic directions. The folds and center panel of this diorama card are made the same was as this card described on my previous blog. If you've made "card in a box" designs before where the card looks like an open box with items sticking out of the top, you'll recognize this card's assembly, especially in the third photo. 


I started out with the front and back pieces cut at 3" by 8.5".  Each strip of paper was scored at 2" from both ends. That becomes the sides of this box. 

I messed up every possible way on my first attempt of this card, including putting the adhesive strips to attach the front piece of card stock to the back (bottom). This wouldn't matter if the same paper was used for both front and back, but the card is pushed over flat to mail (see the last photo) and it just didn't look right to me seeing plain paper sides with the front panel which was a printed paper in my first attempt. 

My original opening was punched out with circles, but I didn't like that look. I tried a label die with scrolls on the ends but it just didn't fit the size of the paper well and I didn't want to re-draft the dimensions. The paper cutter I use is from Stampin Up but other brands are equally handy when it comes to cutting out a window within a piece of paper. 


After scrapping my first attempt, I decided to use white card stock and do some all over stamping on the front piece and on the inner panel. The dimensions of that inner panel are 3" by 6.5" and each end is scored at 1" so that it sits in the middle of the depth of the finished box. 

I used a Stampin Up stamp called Something Lacy but I messed up on that too. I didn't get a clear impression so I turned it over and stamped again. The back side of this inner window doesn't look bad, but the flaps bugged me so I cut paper used in one of the birds to make strips to cover up the ugliness. The stamp used on the front of the card was a large one that I've had for many years. The name and maker are long forgotten. I used a variety of small ink pads from Ranger to color the stamp before applying it to the paper.


I don't always make envelopes to go with handmade cards but this card seemed to call for it.


I will use this technique again but will change it up a bit. I will make the window on the inner layer slightly smaller so that it is more visible. I think embellishments on both the outer and inner windows could make an interesting composition, especially if the overlap the openings a bit. 

Back to my beginning comment about not keeping my notes:  This card wasn't cut at the dimensions listed, it is a bit smaller. I thought 2" sides were too deep so I cut them to be 1.5" deep. That means the front and back were cut at 3" x 8" and scored 1.5" from each end. The inner piece of card stock remained at 3" x 6.5" but was scored at .75" from each end. 

Anytime dimensions are changed, math can be scary so I'll put it his way: Three inches is the height of the card. If you want a taller card, cut all three pieces of paper at that number. Decide how wide you want the face of the card and how deep you want the sides. The face is 5" on my card and each side is 1.5" deep.  5" + 1.5" + 1.5" = 8"  To make the inner panel fit at half the depth of this card, the measure for the face needs to remain the same and the sides need to be half of whatever you chose for the depth of your card. 5" + .75" + .75" = 6.5"

If I wanted to fit a 4" x 6" photo on the inside of the card with a depth of 1.5", I would cut the front and back strips at 4" x 9"  (4" is the height, the width is 1.5" + 6"+ 1.5" = 9") and the inner panel would be cut at 4" x 7" ( .75" + 6" + .75" = 7.5")

Monday, October 19, 2015

Another "Top This" Hat

Months ago I wrote about making a knitted hat from DMC's "Top This" line. That post is here. When I saw the bunny hat in pink, I needed to make it for my granddaughter. 

This was done in a little over 3 hours. The yarn changes on its own and the bunny (or other stuffed decorations in their line) tie onto the completed hat. I could probably be talked into making one of each design because they're all so dang cute.  ( Other hat toppers here )


Speaking of cute, I do believe my granddaughter is asking "Really, Gigi???" as I took this photo.


When she can roll her eyes, I'll be in serious trouble!

Sunday, October 18, 2015

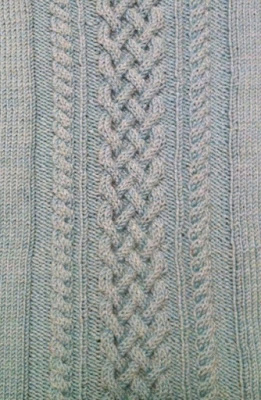
A summer sweater, done in 48* weather

Last spring I kept seeing a sweater in ads in knitting magazines. The pattern was only offered in a book, not a single pattern download. I decided I had to have it anyway and tracked down a store 40 minutes from home that carried it. I could have saved myself money by having the store send it to me but traveling to the store with my sister-in-law (we were destined to be relatives!) was fun. Shopping and lunch ensued and all was good.

The particular yarn called for was not available, but Pediboo by Frog Tree was a good match when I did a sample gauge. The pattern that I fell in love with soon showed me that it wasn't going to become something I would actually wear. While not truly lacy, much of the front was too revealing and would have required a camisole. Would I want to wear a camisole under a sweater in the summer? Probably not. I followed the basic sweater pattern bus skipped their pattern directions and inserted my own.


It took me longer to knit than expected. The pattern wasn't difficult but not paying attention twice while knitting socially (a.k.a. talking too much!) resulted in ripping back a number of rows. Other projects impeded the completion of this and due to working on size 2 needles, progress was destined to be slow. I like how it turned out though. In fact, I LOVE it. 

The color is off in the photo below (indoor overhead lighting) but this photo shows the design well. 


This panel is 55 stitches wide so I figured out the center of the written pattern and used markers to figure out placement. The two foundation rows and 8 row repeat are spelled out below.

It was 48* when I left my knitting group this afternoon. I finished the sweater before I went, so technically the sweater was probably completed while the temp was around 40*F.  With luck, I will wear this at least once this week without it being hidden under a jacket, then it will be ready for me when I take a vacation to warmer weather in February.


And for the record, I did wear a camisole under this but not because of modesty. I was cold!

Stitch code:
C6F =  3 sts to Cable Needle (CN) held in front, K3, K3 from CN
C6B = 3 sts to CN held in back, K3, K3 from CN
T5F = 3 sts to CN held in front, P2, K3 from CN
T5B = 2 sts to CN held in back, K3, P2 from CN

Foundation row of pattern area (55 sts). These two rows prepare the area for the cable pattern.
Row 1: P4,  K6,  P2,  K1,  P2,  (K3,  P4,  K6,  P4,  K6,  P2),  P2,  K1,  P2,  K6,  P4
Row 2: K4,  P6,  K2,  P1,  K2,  (K2,  P6,  K4,  P6,  K4,  P3),  K2,  P1,  K2,  P6,  K4

Pattern Rows: (directions in parentheses are the crossed cables)

Row 1:  P4,  K6,  P2,  K1,  P2,  (K3,  P4,  C6F,  P4,  C6F,  P2),  P2,  K1,  P2,  K6,  P4

Row 2:  K4,  P6,  K2,  P1,  K2,  (K2,  P6,  K4,  P6,  K4,  P3),  K2,  P1,  K2,  P6,  K4

Row 3:  P4,  C6B,  P2,  K1, P2,  (T5F,  T5B,  T5F,  T5B,  T5F),  P2,  K1,  P2,  C6F,  P4

Row 4:  K4,  P6,  K2,  P1,  K2,  (P3,  K4,  P6,  K4,  P6,  K2),  K2,  P1,  K2,  P6,  K4

Row 5:  P4,  K6,  P2,  K1,  P2,  (P2,  C6B,  P4,  C6B,  P4,  K3),  P2,  K1,  P2,  K6,  P4

Row 6:  K4,  P6,  K2,  P1,  K2,  (P3,  K4,  P6,  K4,  P6,  K2),  K2,  P1,  K2,  P6,  K4

Row 7:  P4,  C6B,  P2,  K1, P2,  (T5B,  T5F,  T5B,  T5F,  T5B),  P2,  K1,  P2,  C6F,  P4

Row 8:  K4,  P6,  K2,  P1,  K2,  (K2,  P6,  K4,  P6,  K4,  P3),  K2,  P1,  K2,  P6,  K4

Saturday, October 17, 2015

Curvy Keepsake Pumpkin

Pumpkins are in the air, in our coffee creamer (not mine, truthfully) and on the shelves of paper crafters.


The pumpkin is made using Stampin' Up's Curvy Keepsake die. The pointed part of her hat is two pieces of black paper cut with Stampin' Up's Tree punch. The brim of her hat is a 2.5" circle with a slit made using Word Window punch. The brim is layered over Stampin' Up's Spiderweb doily. I drew a face on both sides of the pumpkin and added a bow (misc Halloween print paper; bow created with Bow Builder punch).


When I make her again (I'm calling this a 'her' because the spiderweb looks lacy and the bow seems feminine), I will draw the face before I curve the flaps and assemble the pumpkin. I might cut the tree shaped pieces free hand, making them both taller and a bit wider. The upper tips of the hat and glued together, the lower part is spread and placed over the handle formed when the keepsake box is assembled. The tree trunk of the punch is folded under the circular brim with a small glue dot holding it in place.


Remember when ladies work small hats with netted veils? I might need to make a vampish pumpkin with the spiderweb doily dipped down over her face. She might need a beauty mark on her face too.

Friday, October 16, 2015

Retirement card

My son asked if I could make a retirement card for a co-worker. After asking a few questions about her post-employment plans, I made this:


The car is a Sizzix die that I have had forever (one of the original thick dies that came in a plastic case) and had only used once.

The headlights are part of the die, punched out, with white glitter paper behind them. Happy Retirement is from Stampin' Up's Teeny Tiny Wishes stamp set, cut with their Word Window punch. There is a sheet of velum behind the car's windshield to make it look more like glass (in my mind anyway) and the star with the hole punched out on the calendar highlights the woman's last day or work.

This sentiment was the inside greeting, mounted on map scrapbook paper to match the cover.


I'm happy to hear that the woman was touched by this and that my son was happy to present this to his fellow coworkers to sign. I made it larger than my typical cards so that 40+ people could sign the card.

Sunday, October 11, 2015

Hogs and Kisses

Last weekend I learned how to make a card that could hold a gift card or cash. My Stampin' Up demonstrator taught this and I knew it was a card I would make more than once.

There are many tutorials available online that feature this or something very similar, often called a pop up gift card holder. This particular card began with a strip of double sided paper, cut at 5.25" x 8 3/8".  Score lines are at 2.25", 3.25", 4.25" and 8.25". The basic card below was done in class so I don't have step by step photos, nor do I have permission to use the directions that were given to us. If you are a card maker or a frequent viewer of Pinterest, you can probably figure out the how, where and why of this. 

I stuck my WW card in place to how you where a gift card would go. That flap has double-sided tape at the bottom holding it together. If you taped at the mountain crease, you wouldn't be able to insert a card or cash. We used the Word Window punch to create the opening but other punches or just a scissor cut would work. 


The notches on the other flap were made to hold the card closed. To close it more securely, an additional embellishment (such as the one I used on the belly band) could be attached to the flap between those notches, placed so that it overlapped the left side flap of the card. I made a belly band instead. At the time I left the class, I did not have an inside greeting or exterior embellishment. I didn't know when or how I would use this card.


I don't want to admit that I'm sometimes a procrastinator so let's just assume I had an extremely busy week and that is why I didn't make a gushy anniversary card for my son and daughter-in-law. Actually, gushy cards aren't my style.  I really had been looking for ideas and pondering various phrases and images but nothing felt right to me.

Early in the week, I was at my favorite scrapbooking store for Copic Club taught by Amy. I found these stickers (Mrs Grossman) and thought the color would work with the paper. I used Stampin' Up circle and scallop circle punches to dress up the belly band, and on the inside, the Happy Anniversary is part of Stampin' Up's Teeny Tiny Wishes set of stamps. The Hogs & Kisses is from Stephanie Barnard's (Stamps of Life) PiggyBank2Stamp set.